
This post is a concise-yet-comprehensive overview of Cucumber-JVM for Java. It is an introduction, a primer, a guide, and a reference. If you are new to BDD, please learn about it before using Cucumber-JVM.
Introduction
![]()
Cucumber is an open-source software test automation framework for behavior-driven development. It uses a business-readable, domain-specific language called Gherkin for specifying feature behaviors that become tests. The Cucumber project started in 2008 when Aslak Hellesøy released the first version of the Cucumber framework for Ruby.
Cucumber-JVM is the official port for Java. Every Gherkin step is “glued” to a step definition method that executes the step. The English text of a step is glued using annotations and regular expressions. Cucumber-JVM integrates nicely with other testing packages. Anything that can be done with Java can be handled by Cucumber-JVM. Cucumber-JVM is ideal for black-box, above-unit, functional tests.
[Update on 7/29/2018: As of version 3.0.0, Cucumber-JVM no longer supports JVM languages other than Java – namely Groovy, Scala, Clojure, and Gosu. Please read Cucumber-JVM is dropping support of JVM Languages on the official Cucumber blog. The Gherkin parser is also now written in Go instead of in Java.]
Example Projects
Github contains two Cucumber-JVM example projects for this guide:
- cucumber-jvm-java-example for traditional annotation-style step defs
- cucumber-jvm-java8-example for Java 8 lambda-style step defs
The projects use Java, Apache Maven, Selenium WebDriver, and AssertJ. The README files include practice exercises as well.
Prerequisite Skills
To be successful with Cucumber-JVM for Java, the following skills are required:
- BDD and Gherkin (read BDD 101 to get up-to-speed)
- Intermediate-level Java programming
- Test automation (like JUnit and TestNG)
- Build process (like ANT, Maven, and Gradle)
Prerequisite Tools
Test machines must have the Java Development Kit (JDK) installed to build and run Cucumber-JVM tests. They should also have the desired build tool installed (such as Apache Maven). The build tool should automatically install Cucumber-JVM packages through dependency management.
An IDE such as JetBrains IntelliJ IDEA (with the Cucumber for Java plugin) or Eclipse (with the Cucumber JVM Eclipse Plugin) is recommended for Cucumber-JVM test automation development. Software configuration management (SCM) with a tool like Git is also strongly recommended.
Versions
Cucumber-JVM 2.0 was released in August 2017 and should be used for new Cucumber-JVM projects. Releases may be found under Maven Group ID io.cucumber. Older Cucumber-JVM 1.x versions may be found under Maven Group ID info.cukes.
Build Management
Apache Maven is the preferred build management tool for Cucumber-JVM projects. All Cucumber-JVM packages are available from the Maven Central Repository. Maven can automatically run Cucumber-JVM tests as part of the build process. Projects using Cucumber-JVM should follow Maven’s Standard Directory Layout. The examples use Maven. Gradle may also be used, but it requires extra setup.
Every Maven project has a POM file for configuration. The POM should contain appropriate Cucumber-JVM dependencies. There is a separate package for each JVM language, dependency injection framework, and underlying unit test runner. Since Cucumber-JVM is a test framework, its dependencies should use test scope. Check io.cucumber on the Maven site for the latest packages and versions.
Project Structure
Cucumber-JVM test automation has the same layered approach as other BDD frameworks:

The higher layers focus more on specification, while the lower layers focus more on implementation. Gherkin feature files and step definition classes are BDD-specific.
Cucumber-JVM tests may be included in the same project as product code or in a separate project. Either way, projects using Cucumber-JVM should follow Maven’s Standard Directory Layout: test code should be located under src/test.
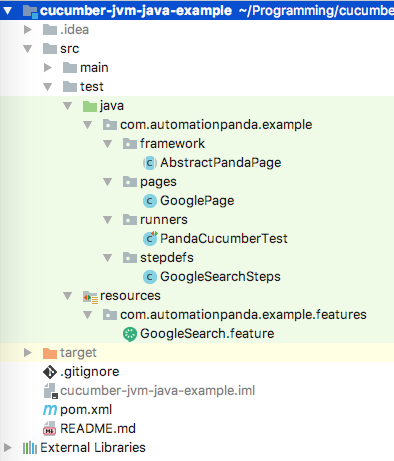
Screenshot of the example project from IntelliJ IDEA’s Project view.
Gherkin Feature Files
Gherkin feature files are text files that contain Gherkin behavior scenarios. They use the “.feature” extension. In a Maven project, they belong under src/test/resources, since they are not Java source files. They should also be organized into a sensible package hierarchy. Refer to other BDD pages for writing good Gherkin.
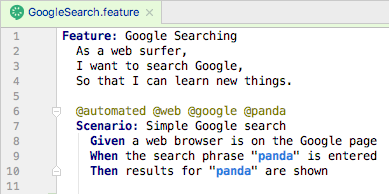
A feature file from the example projects, opened in IntelliJ IDEA.
Step Definition Classes
Step definition classes are Java classes containing methods that implement Gherkin steps. Step def classes are like regular Java classes: they have variables, constructors, and methods. Steps are “glued” to methods using regular expressions. Feature file scenarios can use steps from any step definition class in the project. In a Maven project, step defs belong in packages under src/test/java, and their class names should end in “Steps”.
The Basics
Below is a step definition class from the cucumber-jvm-java-example project, which uses the traditional method annotation style for step defs as part of the cucumber-java package. Each method should throw Throwable so that exceptions are raised up to the Cucumber-JVM framework.
package com.automationpanda.example.stepdefs;

import com.automationpanda.example.pages.GooglePage;
import cucumber.api.java.After;
import cucumber.api.java.Before;
import cucumber.api.java.en.Given;
import cucumber.api.java.en.Then;
import cucumber.api.java.en.When;
import org.openqa.selenium.WebDriver;
import org.openqa.selenium.chrome.ChromeDriver;

import static org.assertj.core.api.Assertions.assertThat;

public class GoogleSearchSteps {

  private WebDriver driver;
  private GooglePage googlePage;

  @Before(value = "@web", order = 1)
  public void initWebDriver() throws Throwable {
    driver = new ChromeDriver();
  }

  @Before(value = "@google", order = 10)
  public void initGooglePage() throws Throwable {
    googlePage = new GooglePage(driver);
  }

  @Given("^a web browser is on the Google page$")
  public void aWebBrowserIsOnTheGooglePage() throws Throwable {
    googlePage.navigateToHomePage();
  }

  @When("^the search phrase \"([^\"]*)\" is entered$")
  public void theSearchPhraseIsEntered(String phrase) throws Throwable {
    googlePage.enterSearchPhrase(phrase);
  }

  @Then("^results for \"([^\"]*)\" are shown$")
  public void resultsForAreShown(String phrase) throws Throwable {
    assertThat(googlePage.pageTitleContains(phrase)).isTrue();
  }

  @After(value = "@web")
  public void disposeWebDriver() throws Throwable {
    driver.quit();
  }
}
Alternatively, in Java 8, step definitions may be written using lambda expressions. As shown in the cucumber-jvm-java8-example project, lambda-style step defs are more concise and may be defined dynamically. The cucumber-java8 package is required:
package com.automationpanda.example.stepdefs;

import com.automationpanda.example.pages.GooglePage;
import cucumber.api.Scenario;
import cucumber.api.java8.En;
import org.openqa.selenium.WebDriver;
import org.openqa.selenium.chrome.ChromeDriver;

import static org.assertj.core.api.Assertions.assertThat;

public class GoogleSearchSteps implements En {

  private WebDriver driver;
  private GooglePage googlePage;

  // Warning: Make sure the timeouts for hooks using a web driver are zero

  public GoogleSearchSteps() {
    Before(new String[]{"@web"}, 0, 1, (Scenario scenario) -> {
      driver = new ChromeDriver();
    });
    Before(new String[]{"@google"}, 0, 10, (Scenario scenario) -> {
      googlePage = new GooglePage(driver);
    });
    Given("^a web browser is on the Google page$", () -> {
      googlePage.navigateToHomePage();
    });
    When("^the search phrase \"([^\"]*)\" is entered$", (String phrase) -> {
      googlePage.enterSearchPhrase(phrase);
    });
    Then("^results for \"([^\"]*)\" are shown$", (String phrase) -> {
      assertThat(googlePage.pageTitleContains(phrase)).isTrue();
    });
    After(new String[]{"@web"}, (Scenario scenario) -> {
      driver.quit();
    });
  }
}
Either way, steps from any feature file are glued to step definition methods/lambdas from any class at runtime:

Gluing a Gherkin step to its Java definition using regular expressions. IDEs have features to automatically generate definition stubs for steps.
For best practice, class inheritance should also be avoided – step bindings in superclasses will trigger DuplicateStepDefinitionException exceptions at runtime, and any step definition concern handled by inheritance can be handled better with other design patterns. Class constructors should be used primarily for dependency injection, while setup operations should instead be handled in Before hooks.
Hooks
Scenarios sometimes need automation-centric setup and cleanup routines that should not be specified in Gherkin. For example, web tests must first initialize a Selenium WebDriver instance. Step definition classes can have Before and After hooks that run before and after a scenario. They are analogous to setup and teardown methods from other test frameworks like JUnit. Hooks may optionally specify tags for the scenarios to which they apply, as well as an order number. They are similar to Aspect-Oriented Programming. After hooks will run even if a scenario has an exception or abortive assertion – use them for cleanup routines instead of Gherkin steps to guarantee cleanup runs.
The code snippet below shows Before and After hooks from the traditional-style example project. The order given to the Before hooks guarantees the web driver is initialized before the page object is created.
  @Before(value = "@web", order = 1)
  public void initWebDriver() throws Throwable {
    driver = new ChromeDriver();
  }

  @Before(value = "@google", order = 10)
  public void initGooglePage() throws Throwable {
    googlePage = new GooglePage(driver);
  }

  @After(value = "@web")
  public void disposeWebDriver() throws Throwable {
    driver.quit();
  }
Before and After hooks surround scenarios only. Cucumber-JVM does not provide hooks to surround the whole test suite. This protects test case independence but makes global setup and cleanup challenging. The best workaround is to use the singleton pattern with lazy initialization. The solution is documented in Cucumber-JVM Global Hook Workarounds.
Dependency Injection
Cucumber-JVM supports dependency injection (DI) as a way to share objects between step definition classes. For example, steps in different classes may need to share the same web driver instance. Cucumber-JVM supports many DI modules, and each has its own dependency package. As a warning, do not use static variables for sharing objects between step definition classes – static variables can break test independence and parallelization.
PicoContainer is the simplest DI framework and is recommended for most needs. Dependency injection hinges upon step definition class constructors. Without DI, step def constructors must not have parameters. With DI, PicoContainer will automatically construct each object in a step def constructor signature and pass them in when the step def object is constructed. Furthermore, the same object is injected into all step def classes that have its type as a constructor parameter. Objects that require constructor parameters should use a holder or caching class to provide the necessary arguments. Note that dependency-injected objects are created fresh for each scenario.
Below is a trivial example for how to apply dependency injection using PicoContainer to initialize the web driver in the example projects. (A more advanced example would read browser type from a config file and set the web driver accordingly.)
public class WebDriverHolder {
  private WebDriver driver;
  public WebDriver getDriver() {
    return driver;
  }
  public void initWebDriver() {
    driver = new ChromeDriver();
  }
}

public class GoogleSearchSteps {
  private WebDriverHolder holder;
  public GoogleSearchSteps(WebDriverHolder holder) {
    this.holder = holder;
  }
  @Before
  public void initWebDriver() throws Throwable {
    if (holder.getDriver() == null)
      holder.initWebDriver();
  }
}
Automation Support Classes
Automation support classes are extra classes outside of the Cucumber-JVM framework itself that are needed for test automation. They could come from the same test project, a separate but proprietary package, or an open-source package. Regardless of the source, they should fold into build management. They can integrate seamlessly with Cucumber-JVM. Step definitions should be very short because the bulk of automation work should be handled by support classes for maximum code reusability.
Popular open-source Java packages for test automation support are:
- Selenium WebDriver for web browser interactions
- REST Assured for REST API calls
- AssertJ for assertions
- SLF4J, Logback, and log4j2 for logging
- Extent Reports for test reporting
Page objects, file readers, and data processors also count as support classes.
Configuration Files
Configuration files are extra files outside of the Cucumber-JVM framework that provide environment-specific data to the tests, such as URLs, usernames, passwords, logging/reporting settings, and database connections. They should be saved in standard formats like CSV, XML, JSON, or Java Properties, and they should be read into memory once at the start of the test suite using global hook workarounds. The automation code should look for files at predetermined locations or using paths passed in as environment variables or properties.
Not all test automation projects need config files, but many do. Never hard-code config data into the automation code. Avoid non-text-based formats like Microsoft Excel so that version control can easily do diffs, and avoid non-standard formats that require custom parsers because they require extra development and maintenance time.
Running Tests
Cucumber-JVM tests may be run in a number of ways.
Using JUnit or TestNG
The cucumber-junit and cucumber-testng packages enable JUnit and TestNG respectively to run Cucumber-JVM tests. They require test runner classes that provide CucumberOptions for how to run the tests. A project may have more than one runner class. The example projects use the JUnit runner like this:
package com.automationpanda.example.runners;

import cucumber.api.CucumberOptions;
import cucumber.api.junit.Cucumber;
import org.junit.runner.RunWith;

@RunWith(Cucumber.class)
@CucumberOptions(
  plugin = {"pretty", "html:target/cucumber", "junit:target/cucumber.xml"},
  features = "src/test/resources/com/automationpanda/example/features",
  glue = {"com.automationpanda.example.stepdefs"})
public class PandaCucumberTest {
}
JUnit and TestNG runners can also be picked up by build management tools. For example, Maven will automatically run any runner classes named *Test.java during the test phase and *IT.java during the verify phase. Be sure to include the clean option to delete old test results. Avoid duplicate test runs by making sure runner classes do not cover the same tests – use tags to avoid duplicate coverage.
Using the Command Line Runner
Cucumber-JVM provides a CLI runner that can run feature files directly from the command line. To use it, invoke:
java cucumber.api.cli.Main
Run with “–help” to see all available options.
Using IDEs
Both JetBrains IntelliJ IDEA (with the Cucumber for Java plugin) and Eclipse (with the Cucumber JVM Eclipse Plugin) are great IDEs for Cucumber-JVM test development. They provide features for linking steps to definitions, generating definition stubs, and running tests with various options.
Cucumber Options
Cucumber options may be specified either in a runner class or from the command line as a Java system property. Set options from the command line using “-Dcucumber.options” – it will work for any java or mvn command. To see all available options, set the options to “–help”, or check the official Cucumber-JVM doc page.
The most useful option is probably the tags option. Selecting tags to run dynamically at runtime, rather than statically in runner classes, is very useful. In Cucumber-JVM 2.0, tag expressions use a basic English Boolean language:
@automated and @web
@web or @service
not @manual
(@web or @service) and (not @wip)
Older version of Cucumber-JVM used a more complicated syntax with tildes and commas.
Parallel Execution
Parallel test execution greatly reduces total start-to-end testing time. However, it requires additional machines to run tests, tools and config to handle parallel runs, and tests to be written to avoid collisions. As of version 4.0.0, Cucumber-JVM supports parallel execution out of the box. Previously, the most common way to do parallel test runs in Cucumber-JVM was to use a Maven plugin like the Cucumber-JVM Parallel Plugin or the Cucable plugin from Trivago.
[Update on 9/24/2018: Mentioned that Cucumber-JVM supports parallel execution starting with version 4.0.0.]

Hye, do you have any example for the gradle junit cucumber task where there will be two task with different feature file location?
LikeLike
Unfortunately, I do not. Please share in the comments if you find one.
LikeLike
Hi,
When I implemented cucumber-java8, on running the feature file, I only see the Scenario names and their execution – it doesnot show the execution of the Steps , like we see in the earlier version of Cucumber. How can we show the step execution too in the cucumber-java8
LikeLike
Are you referring to Cucumber with Java 8 in general, or my https://github.com/AndyLPK247/cucumber-jvm-java8-example project specifically?
LikeLike
Hi Andy
I am referring to Cucumber with Java8 in general;
I am refactoring the cucumber code to Cucumber Java8 , the difference I see in the run window is:
1) Cucumber api – In Run window, it would show the execution of Scenario Outline -> Example 1 -> Gherkin steps( Given , Then , …)
2) Cucumber with java 8 – In Run Window, Scenario outline mutliple times if I have multiple examples. It doesnot show the individual Gherkin steps in the Run Window.
I am not sure whether I am missing out something which is causing it or is this the way it will run
LikeLike
Andy – Do you see the same difference in the execution window? I even tried configuring your example code but it is failing at my end.. Any help on this would be greatly appreciated. I am wondering whether I should go back to the cucumber api?
LikeLike
Hi,
Can I run same feature file for multiple time. For example i want to execute same feature file for give set of data in the excel (For any number of users mentioned in the excel file. user can be variable 1,2 3 so on)
LikeLike
You can’t just replace the Examples table with an Excel spreadsheet using Cucumber-JVM. You can make step definition methods read from Excel files to get test data, but you can’t avoid using the Examples table if you want to run a scenario for multiple inputs. See https://startingwithseleniumwebdriver.blogspot.com/2017/04/getting-data-from-external-file-using.html.
LikeLike
Hi, Is there any way to specify the timeout to a scenario.
LikeLike
Hi Ganesh! You’d need to specify timeouts in step definitions. I’d recommend setting timeouts at the level of interactions (such as Web UI or REST API calls).
LikeLike