Picture this: It’s 2010, and I’m fresh out of college, eager to dive into the software industry. Little did I know, a simple interview question would challenge not only my knowledge about testing but also my instincts.
Job openings were hard to find in the wake of the Great Recession. Thankfully, I landed a few interviews with IBM, where I completed a series of internships over the summers of 2007-2009. I was willing to take any kind of job – as long as it involved coding. One of those interviews was for an entry-level position on a data warehouse team in Boston. I honestly don’t remember much from this interview, but there was one question I will never forget:
How do you know when you’ve done enough testing?
Now, remember, back in 2010, I wasn’t the Automation Panda yet. Nevertheless, since I had experience with testing during my internships, I felt prepared to give a reasonable answer. If I recall correctly, I said something about covering all paths through the code and being mindful to consider edge cases that could be overlooked. (My answer today would likely frame “completeness” around acceptable risk, but that’s not the point of the story.) I’ll never forget what the interviewer said in reply:
Well, that’s not the answer I was looking for.
Oh? What’s the “right” answer?
If you write roughly the same number of lines of test code as you write for product code, then you have enough coverage.
That answer stunned me. Despite my limited real-world experience as a recent college graduate, I knew that answer was blatantly wrong. During my internships, I wrote plenty of code with plenty of tests, and I knew from experience that there was no correlation between lines of test code and actual coverage. Even a short snippet could require multiple tests to thoroughly cover all of its variations.
For example, here’s a small Python class that keeps track of a counter:
class Counter:

  def __init__(self):
    self.count = 0

  def add(self, more=1):
    self.count += more
There are three times as many lines of test code as product code, and I could still come up with a few more test cases.
In the moment, I didn’t know how to reply to the interviewer. He sounded very confident in his answer. All I could say was, “I don’t think I agree with that.” I didn’t have any examples or evidence to share; I just had my gut feeling.
I sensed my interviewer’s disappointment with my response. Who was I, a lowly intern, to challenge a senior engineer? Needless to say, I did not receive a job offer. I ended up taking a different job with IBM in Raleigh-Durham instead.
Nevertheless, this exchange taught me a very valuable lesson: trust your instincts. While I didn’t land the job that day, the encounter left an indelible mark on my approach to problem-solving. It instilled in me the confidence to question assumptions and trust my instincts, qualities that would shape my career trajectory in unforeseen ways. Never dismiss your instincts because you are less senior than others. You just might be right!
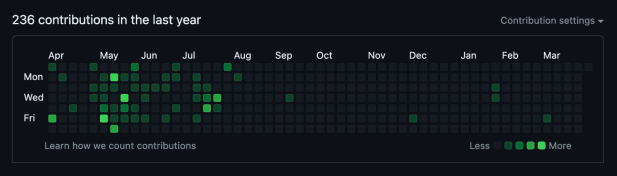
The main image for this article shows all my GitHub contributions for the past year (roughly April 2023 through March 2024). Check it out. ☝️🐼
Notice anything?
.
My contributions pretty much stopped around August 2023.
.
Why?
.
That’s when I changed jobs.
Until July 2023, all my professional coding work went into open source repositories in GitHub. After changing jobs, all my professional coding work went into closed source repositories in Azure DevOps.
Did I suddenly stop coding at that time? No. In fact, I did more coding – and arguably more serious development work – at the second job.
Tech social media periodically explodes with posts saying how developers who don’t have walls of solid green GitHub tiles aren’t “serious” about their work. How the folks writing these posts wouldn’t hire developers who don’t have enough green tiles. How any developer worth their salt should regularly contribute to open source projects outside of their 9-5 job. These posts are sometimes sarcastic, but they are, unfortunately, all too often sincere – and you can’t always tell.
These posts are rubbish. It is foolish to judge a developer by the number of GitHub contributions they make. Sure, it can be a helpful data point when reviewing someone’s body of work, but it is merely one data point. Someone’s lack of green tiles should not justify putting them down. It should not immediately disqualify them as a candidate from a job opening. Not everyone’s work involves open source contributions to a particular hosting site. Not everyone’s life permits extra work-like work outside of work, especially for zero pay.
Open source contributions are a great way to give back to the software community as well as to build up one’s skills. It’s also a great way to show one’s work publicly. But please, don’t fall for the trolling – either for the flame wars or for the insinuations of inadequacy. There are plenty of talented individuals who don’t have a wall of solid green tiles to “prove” their skills, myself included.
All software engineers are the same, right? Well, not exactly. There is a strata of different seniority levels, each with its own expectations for experience, responsibilities, and pay. This article is a concise collection of my observations on seniority levels for software engineers.
The levels
Every company is different, but I’ve seen most companies coalesce around the following levels:
Level
Responsibilities
In Plain Terms
Entry
Do what you are told. Learn as much as you can.
“What’s a cookie?”
Intermediate
Complete tasks independently. Get things done. Be a good team player.
“I bake chocolate chip cookies.”
Senior
Take ownership of bigger projects. Know what you’re talking about. Help other engineers get unstuck.
“I help folks mix cookie batter.”
Staff
Provide technical direction for an organization. Collaborate cross-functionally for technology alignment. Do the needful to keep projects moving. Mentor other engineers.
“I make cookie recipes.”
Principal
Provide technical direction for a company or even an industry. Collaborate with management for business alignment. Carry significant influence backed by deep experience.
“I know everything about cookies.”
Distinguished
Make exceptional technical contributions to the company. Shape the direction of the company and its technologies.
“I invented the ice cream sandwich.”
Fellow
Create and guide a crucial technology that drives a significant portion of the company’s revenue for several years.
“I am the Cookie Monster.”
These levels usually apply for all types of engineers (frontend, backend, test, data, DevOps; whatever) up to Principal. Again, specific details vary by company.
Population at each level
The breaking point tends to be between Senior and Staff. Many engineers make it to Senior. A few make it to Staff. Fewer make it to Principal. Distinguished and Fellow are very, very rare. Some companies don’t even have Distinguished or Fellow.
Earning promotions
There are two main ways to earn a promotion:
Start fulfilling responsibilities for the next seniority level above you. Then, clearly advocate for a promotion to your manager leading up to your periodic performance reviews. Finally, hope that you get selected for a promotion.
Switch to a new job that has the title you want. Usually, this needs to be at another company.
Switching companies is typically the fastest way to climb the seniority ladder as well as to increase your pay. Many companies impose quotas for annual raises and promotions.
Salary ranges
Seniority titles are important because they impact pay. Usually, a company sets a salary range for each seniority level. When you get promoted to a new level, your salary starts at the low end of the range for that level. As you progress within the level, you will (hopefully) earn raises that put you higher within the salary range. Eventually, once you hit the top of the range, you can’t earn more raises until you earn a promotion to the next seniority level. Also, good luck finding out what those salary ranges actually are. Many companies keep them secret.
Title mismatch
Someone’s seniority prefix does not always match their actual capabilities. Sometimes, their title is lower than the level at which they perform. This happened to me once when a bigger company bought the startup where I worked and reassigned everyone’s titles to fit their own career tracks. More often, though, I’ve seen “title inflation” where an engineer is given a higher title than their capabilities reflect. Companies usually do this either to hold onto important engineers or to woo prospective new hires. In those cases, titles match salary band, rather than salary matching seniority. That’s why it’s more important to look at a person’s accomplishments rather than the prefix on their title.
Becoming a manager
It is commonplace for engineers to become managers. However, engineering and management are separate tracks requiring distinct skill sets. The difference is the focus of the work: technology (engineer) or people and business (manager). If a company has a well-defined seniority ladder for engineering, then engineers don’t need to become managers to earn a “promotion.”
Other thoughts?
This information is all anecdotal based on my general experiences. What have you seen? Let me know in the comments below!
Today, I have very exciting news to share: I have accepted a new position as Principal Architect at Cycle Labs! This is a wonderful new job opportunity for me. Watch the video below to learn more:
So, what is Cycle?
Cycle is a way of testing software from inspiration to implementation. Cycle Labs provides an end-to-end test automation platform for the Cycle Testing Process that targets enterprise software, specifically in supply chain and warehouse management. It can test everything from web UIs to APIs, desktop apps, and even green screen terminals. The cornerstone of the platform is CycleScript, a domain-specific language for automating business processes that looks a lot like Gherkin. One thing I love about Cycle is that it truly empowers behavior-focused development and testing.
Now, what is my new job?
I will be the Principal Architect at Cycle Labs! My primary responsibility is building and designing the Cycle testing platform together with the Product & Engineering team. Already, I’m leading a new product vision that will optimize how our customers use our platform for their whole test development process. We have some really cool stuff in the pipeline, and I can’t wait to share more as we build it. It hits so many of my favorite topics: quality, automation, behaviors, languages, and clean architecture.
Why Cycle Labs?
My new architect role might be a surprise for many of you, but others are probably thinking that it’s about time! I’ve known Cycle for years, and I have a long, deep, and personal history with the good folks behind it – particularly with Josh Owen, the CEO. We’ve worked together. We’ve dreamed together. And when Josh opened this new opportunity for me, I just couldn’t say no. I am thrilled to officially become part of Cycle Labs.
When do I start my new role at Cycle Labs?
Well, actually, I’ve already started! My first day was July 31, and I hit the ground running. The main office for Cycle Labs is located in downtown Raleigh, and I’ve been going there in person about once a week.
What about my speaking and community engagements?
I still plan to be active in the software developer and tester communities, but since I won’t be a Developer Advocate anymore, I will be reducing the number of engagements I accept. I’ll probably try to limit myself to only a few important in-person conferences a year and perhaps a handful of virtual events. In the future, I want to focus more on finishing the book I’m writing, and I also have a few cool ideas for other content I can produce. So, stay tuned!
Who do I want to thank?
I have so very many people to thank through my time at Applitools and into my new role at Cycle Labs.
First, I want to thank God for all the opportunities with which He has blessed me.
My wife, Lujing, thank you for always supporting me in my career.
Alex and Sam, thanks for being there when times were tough.
Medic Matt, thanks for always checking in on me and letting me come visit.
Mason Egger, thanks for giving me excellent guidance on how to run a good Developer Relations practice, and also for inviting me to give my first Python conference keynote at PyTexas 2023.
Filip Hric, thanks for being such a great content collaborator and for always being just one Zoom call away.
Sarah Watkins, thanks for the many good times shared over bubble tea, and for joining me at STAREAST and STARWEST to co-teach our BDD tutorial.
Josh Owen, thanks for hiring me to join Cycle Labs! It took a while, but it finally happened.
Everyone on the team at Cycle Labs, thanks so much for the warm welcome, and I’m excited to build great things together.
Joe Moore and Chris Harbert, y’all did right by me. Thank you. I hold much respect for you.
Angie Jones and Moshe Milman, thanks for trusting me to lead the Developer Relations practice at Applitools.
Jenny Bramble, Jenna Charlton, Erin Crise, and Tristan Lombard, y’all share the best insights and advice with deep empathy. I’m thankful that we are all good friends.
All my friends in the community – the list goes on and on – thanks for being my friends and making the past few years wonderful.
So, what’s next?
For the second half of 2023, I want to focus on making a good start at Cycle Labs. I still have a few speaking engagements lined up as well: STARWEST, DjangoCon US, Agile Testing Days, and AutomationSTAR. I have a lot of repairs to do on my classic Volkswagens. I also want to spend more time with my family and our little French Bulldog puppy.
Things change and roles change. I’ve been a Software Engineer in Test, a Developer Advocate, and now a Software Architect. It’s an exciting journey for sure. One thing that remains the same is that I’m still the Automation Panda – and nobody can change that.
Thank you all for the love and support. Let’s be excellent in all things.
It’s no secret that 🐼❤️🧋! Seattle has several excellent tea establishments, and each one is special. In this post, I list my top twelve favorite bubble tea shops that I enjoy whenever I visit. This is my personal list of favorites in no particular order – it’s not a comprehensive ranking because, quite frankly, there are so many tea shops I haven’t yet tried!
#1. Xing Fu Tang
Xing Fu Tang is one of the best boba brands to come out of Taiwan. They pride themselves on their handmade brown sugar boba. At their locations in Taiwan, you can actually see them knead the tapioca dough and feed it through the machine to separate it into the pearl! At their Westlake Center location on 4th and Steward, they don’t have that machine on display, but you can see them cook all the boba in a big copper wok.
Pandy’s recommendation: Get the classic brown sugar boba with milk or milk tea – it’s the drink that made them famous!
#2. Rabbit Rabbit Tea Seattle
Rabbit Rabbit Tea Seattle is another bubble tea brand from Taiwan. They set themselves apart with their selection of premium teas: two black (Assam and Earl Grey), two green (Jade Green and Mountain), two oolong (Golden Jinxuan and Iron Buddha, and two kinds of Japanese buckwheat tea. They also give you little rabbit face wrappers for your straws!
Pandy’s recommendation: Get the Japanese buckwheat tea with less sugar and honey boba. I’ve never seen another boba shop sell buckwheat tea, and it’s so good!
#3. Tiger Sugar
Tiger Sugar is another famous bubble tea chain with many locations throughout the United States. Their Seattle location is at 2nd and Pike, a stone’s throw from Pike Place Market. Although this spot is little more than a pickup counter, its location makes it a convenient stop when passing through downtown. Tiger Sugar is known for bold flavors, both in sweetness and in the tea.
Pandy’s recommendation: If you want something sweet, order a drink from the Black Sugar Milk series. If you want something refreshing, order any of the teas with the mousse on top. As always, add boba!
#4. Tea King
Tea King is low-key one of my favorite boba shops ever. While well-known tea franchises are great, there’s something special about independent tea shops making their own drinks their own way. Tea King nails it. Their drinks are consistently the most excellent bubble teas I’ve tasted anywhere. Their teas are premium. Their selection is wide: milk, fruit, slush, and dessert. Their branding is on point – I put their sticker on my laptop! Their location is squeezed between Queen Anne and and Lake Union, but the trek is worth it.
Pandy’s recommendation: The TK Milk Tea with boba is an excellent rendition of the classic bubble tea. The Hojicha Latte and the Taro Coco Sago are delightful specialties you won’t readily find elsewhere.
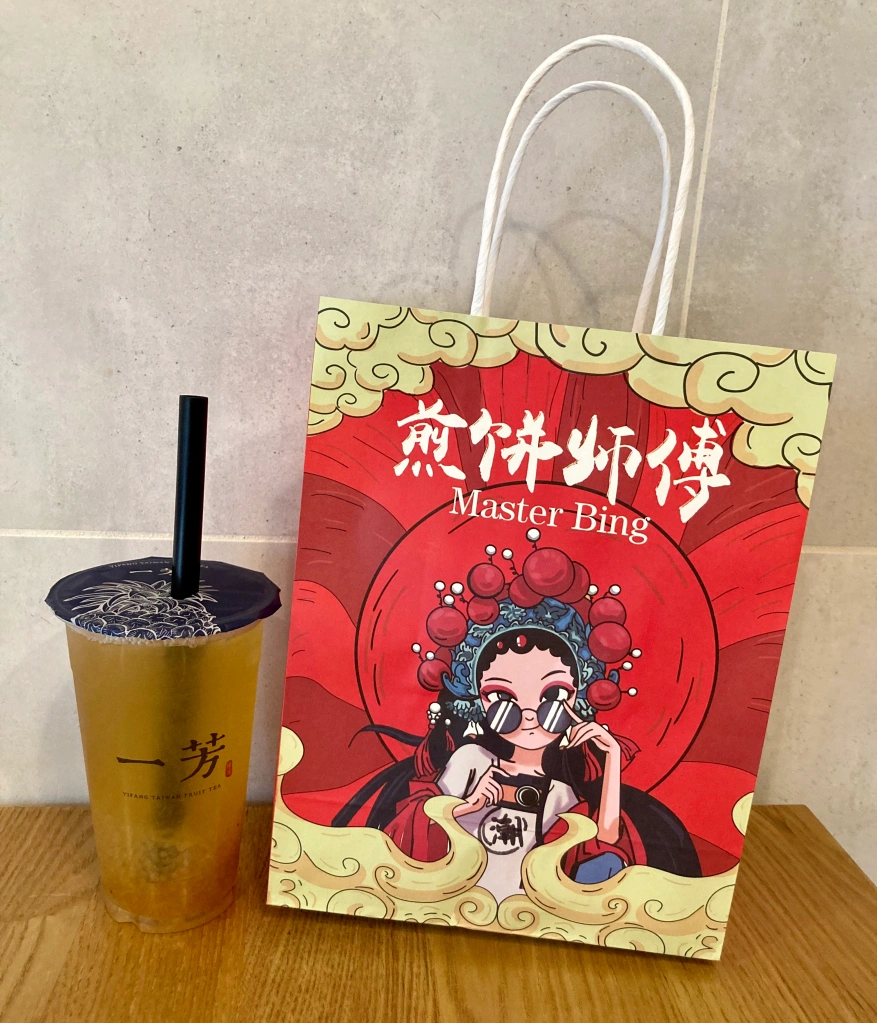
#5. Yifang Taiwan Fruit Tea
Yifang Taiwan Fruit Tea is probably my favorite bubble tea brand. I first discovered them in San Francisco, and every time I go to a city that has a location, I try to stop by. As the name suggests, Yifang is known for their fruit teas. In fact, I didn’t really care much for fruit teas until I tried Yifang’s pineapple green tea! They also make delicious little bubble tea shaped pancakes with boba inside. Try to visit the locations in the University District or in Bellevue.
Pandy’s recommendation: Try the pineapple fruit tea with half (or less) sugar and sago. Bonus points for the Yakult version.
#6. TP Tea
TP Tea is my favorite tea shop in the International District. As yet another Taiwanese brand, they focus on classic milk teas with high-quality ingredients. Their location in the ID is always popular, and I dig the interior design. I’ve never been disappointed by their drinks, either. Look for the drinks with multiple toppings, like boba plus QQ noodles.
Pandy’s recommendation: Get the Taiwan Classic Milk Tea or the 3Q TP Milk Tea – they have multiple toppings with a variety of textures.
#7. OH! Bear Cafe & TeaHouse
OH! Bear Cafe & TeaHouse is a cute little dessert cafe in the University District. It’s an excellent place to come for a date with your significant other – and to get diabetes from all the sugar! They have pastries, ice cream, taiyaki, coffee, and bubble tea. Their most notable drink is their White Rabbit Milk Tea, which uses flavoring from China’s famous White Rabbit candy.
Pandy’s recommendation: Try the White Rabbit Milk Tea along with any of their desserts.
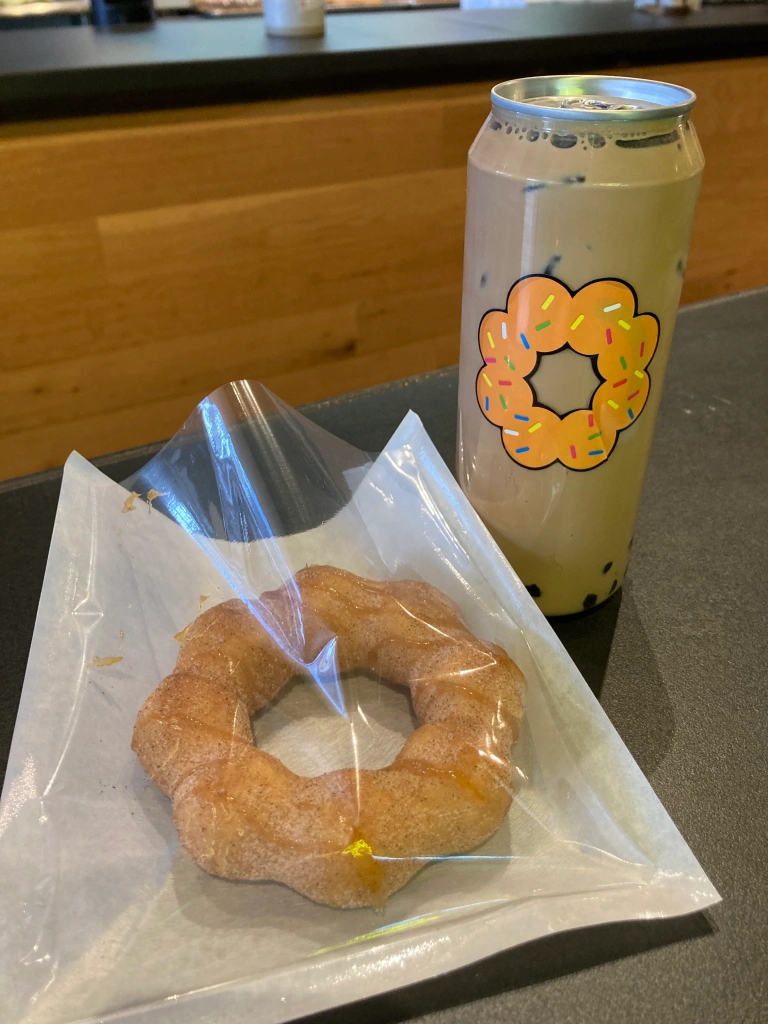
#8. Mochinut
Mochinut is located in South Lake Union amongst all the Google and Amazon buildings. While Mochinut is known primarily for their mochi donuts, they also serve bubble tea in distinctive clear plastic cans. All their drinks are very sweet, so be prepared. You can also order Korean-style corndogs!
Pandy’s recommendation: Come here for the mochi donuts and get a drink to pair.
#9. Happy Lemon
Happy Lemon is another well-known brand with a location in South Lake Union. Their drinks have striking presentation, and most of them are very sweet. Happy Lemon also sells bubble waffles at this location. It’s a nice stop if you’re in the neighborhood and want a sweet treat.
Pandy’s recommendation: Come here if you want something sweet.
#10. ChiCha San Chen
ChiCha San Chen is one of the most excellent tea establishments I’ve ever visited. Although their location is in Bellevue, it is so highly regarded that folks from all over the Seattle greater area go to visit. Although ChiCha San Chen did not earn any Michelin stars as widely rumored, they did earn the highest award from ITQI in 2017, which is just as good. When you walk into their shop, you smell the tea, not the sugar. They use a special “teapresso” machine named LION for brewing their tea. They offer free samples. When they serve the drinks, they put them in carriers with twine handles. My wife and I have visited only once, but we are looking forward to going back!
Pandy’s recommendation: Get anything with the green tea. I also want to try the Ding Dong Oolong Tea because I heard that it is very good.
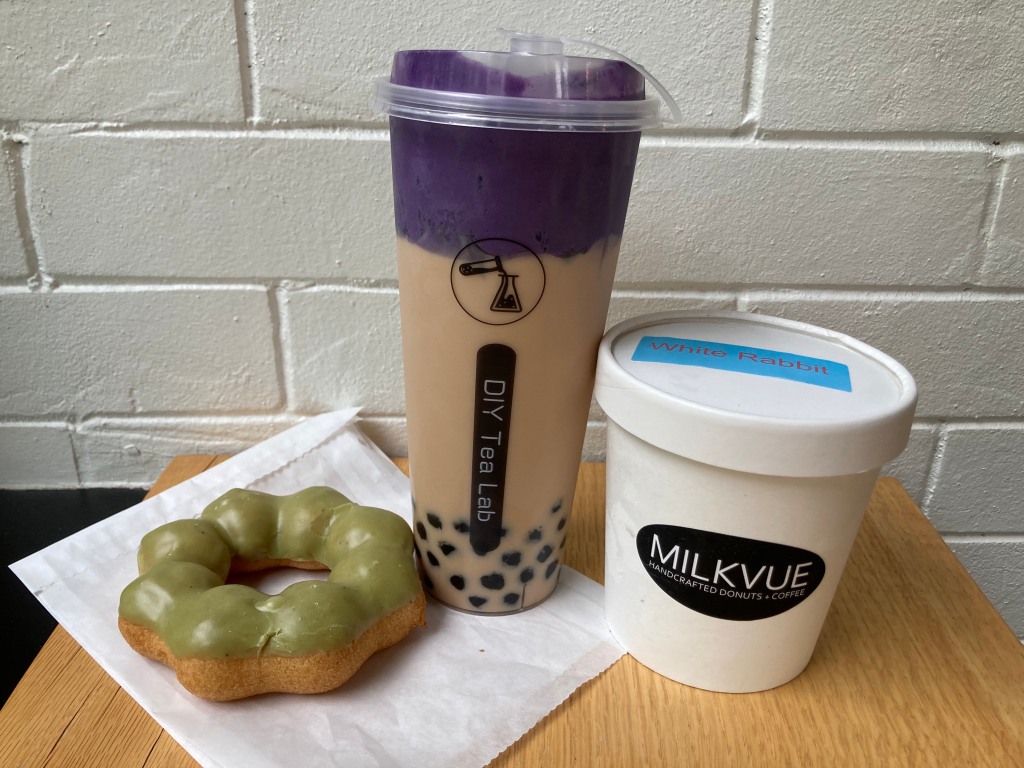
#11. Milkvue + DIY Tea Lab
Milkvue + DIY Tea Lab is a new place that just opened next to the Space Needle. They serve coffee, boba, mochi donuts, and ice cream. The owners are super friendly, too. The bubble tea is a collab with DIY Tea Lab, which also has locations in Fremont and Ballard. Their drink sizes are all large and visually appealing. You can also order boba here before lunchtime! Don’t sleep on their ice cream, either – they have flavors like Ube + Oreo and White Rabbit!
Pandy’s recommendation: My wife and I enjoyed the Sea Salt Ube Milk Tea with a matcha mochinut. We also took a pint of the White Rabbit ice cream home!
#12. Nana’s Green Tea
Nana’s Green Tea is essentially a matcha cafe. They serve standard Japanese lunch fair like curry plates, rice bowls, and tonkatsu, but the star of the menu is the matcha. You can order matcha in pretty much any form you can imagine: lattes, frappes, ice cream, parfaits, floats, sodas, pastries, and just straight tea. They also have lattes for hojicha and red bean. It’s awesome. It’s decadent. And even though they don’t serve boba, the little mochi toppings are close enough, right?
Pandy’s recommendation: Come here for the matcha. I like the lattes and the frappes with mochi on top.
Bonus: Miro Tea
Miro Tea is the ultimate tea house. This is not a place for boba but rather for high-quality loose leaf teas from around the world. It’s like a high-end coffee shop with expert baristas, but for tea instead of coffee. You can order tea by the pot and even as a Gongfu tea ceremony. They have plenty of seating for you to work, read, or simply space out while enjoying your tea. I enjoy hopping over to Ballard just to enjoy their fine selection.
Pandy’s recommendation: Try the samples they have to decide what kind of tea you want. Plan to spend at least an hour there instead of taking your tea away in a cup.
Playwright is an awesome new web testing framework, and it can help you take a modern approach to web development. In this article, let’s learn how.
Asking tough questions about testing
Let me ask you a series of questions:
Question 1: Do you like it when bugs happen in your code? Most likely not. Bugs are problems. They shouldn’t happen in the first place, and they require effort to fix. They’re a big hassle.
Question 2: Would you rather let those bugs ship to production? Absolutely not! We want to fix bugs before users ever see them. Serious bugs could cause a lot of damage to systems, businesses, and even reputations. Whenever bugs do slip into production, we want to find them and fix them ASAP.
Question 3: Do you like to create tests to catch bugs before that happens? Hmmm… this question is tougher to answer. Most folks understand that good tests can provide valuable feedback on software quality, but not everyone likes to put in the work for testing.
Why the distaste for testing?
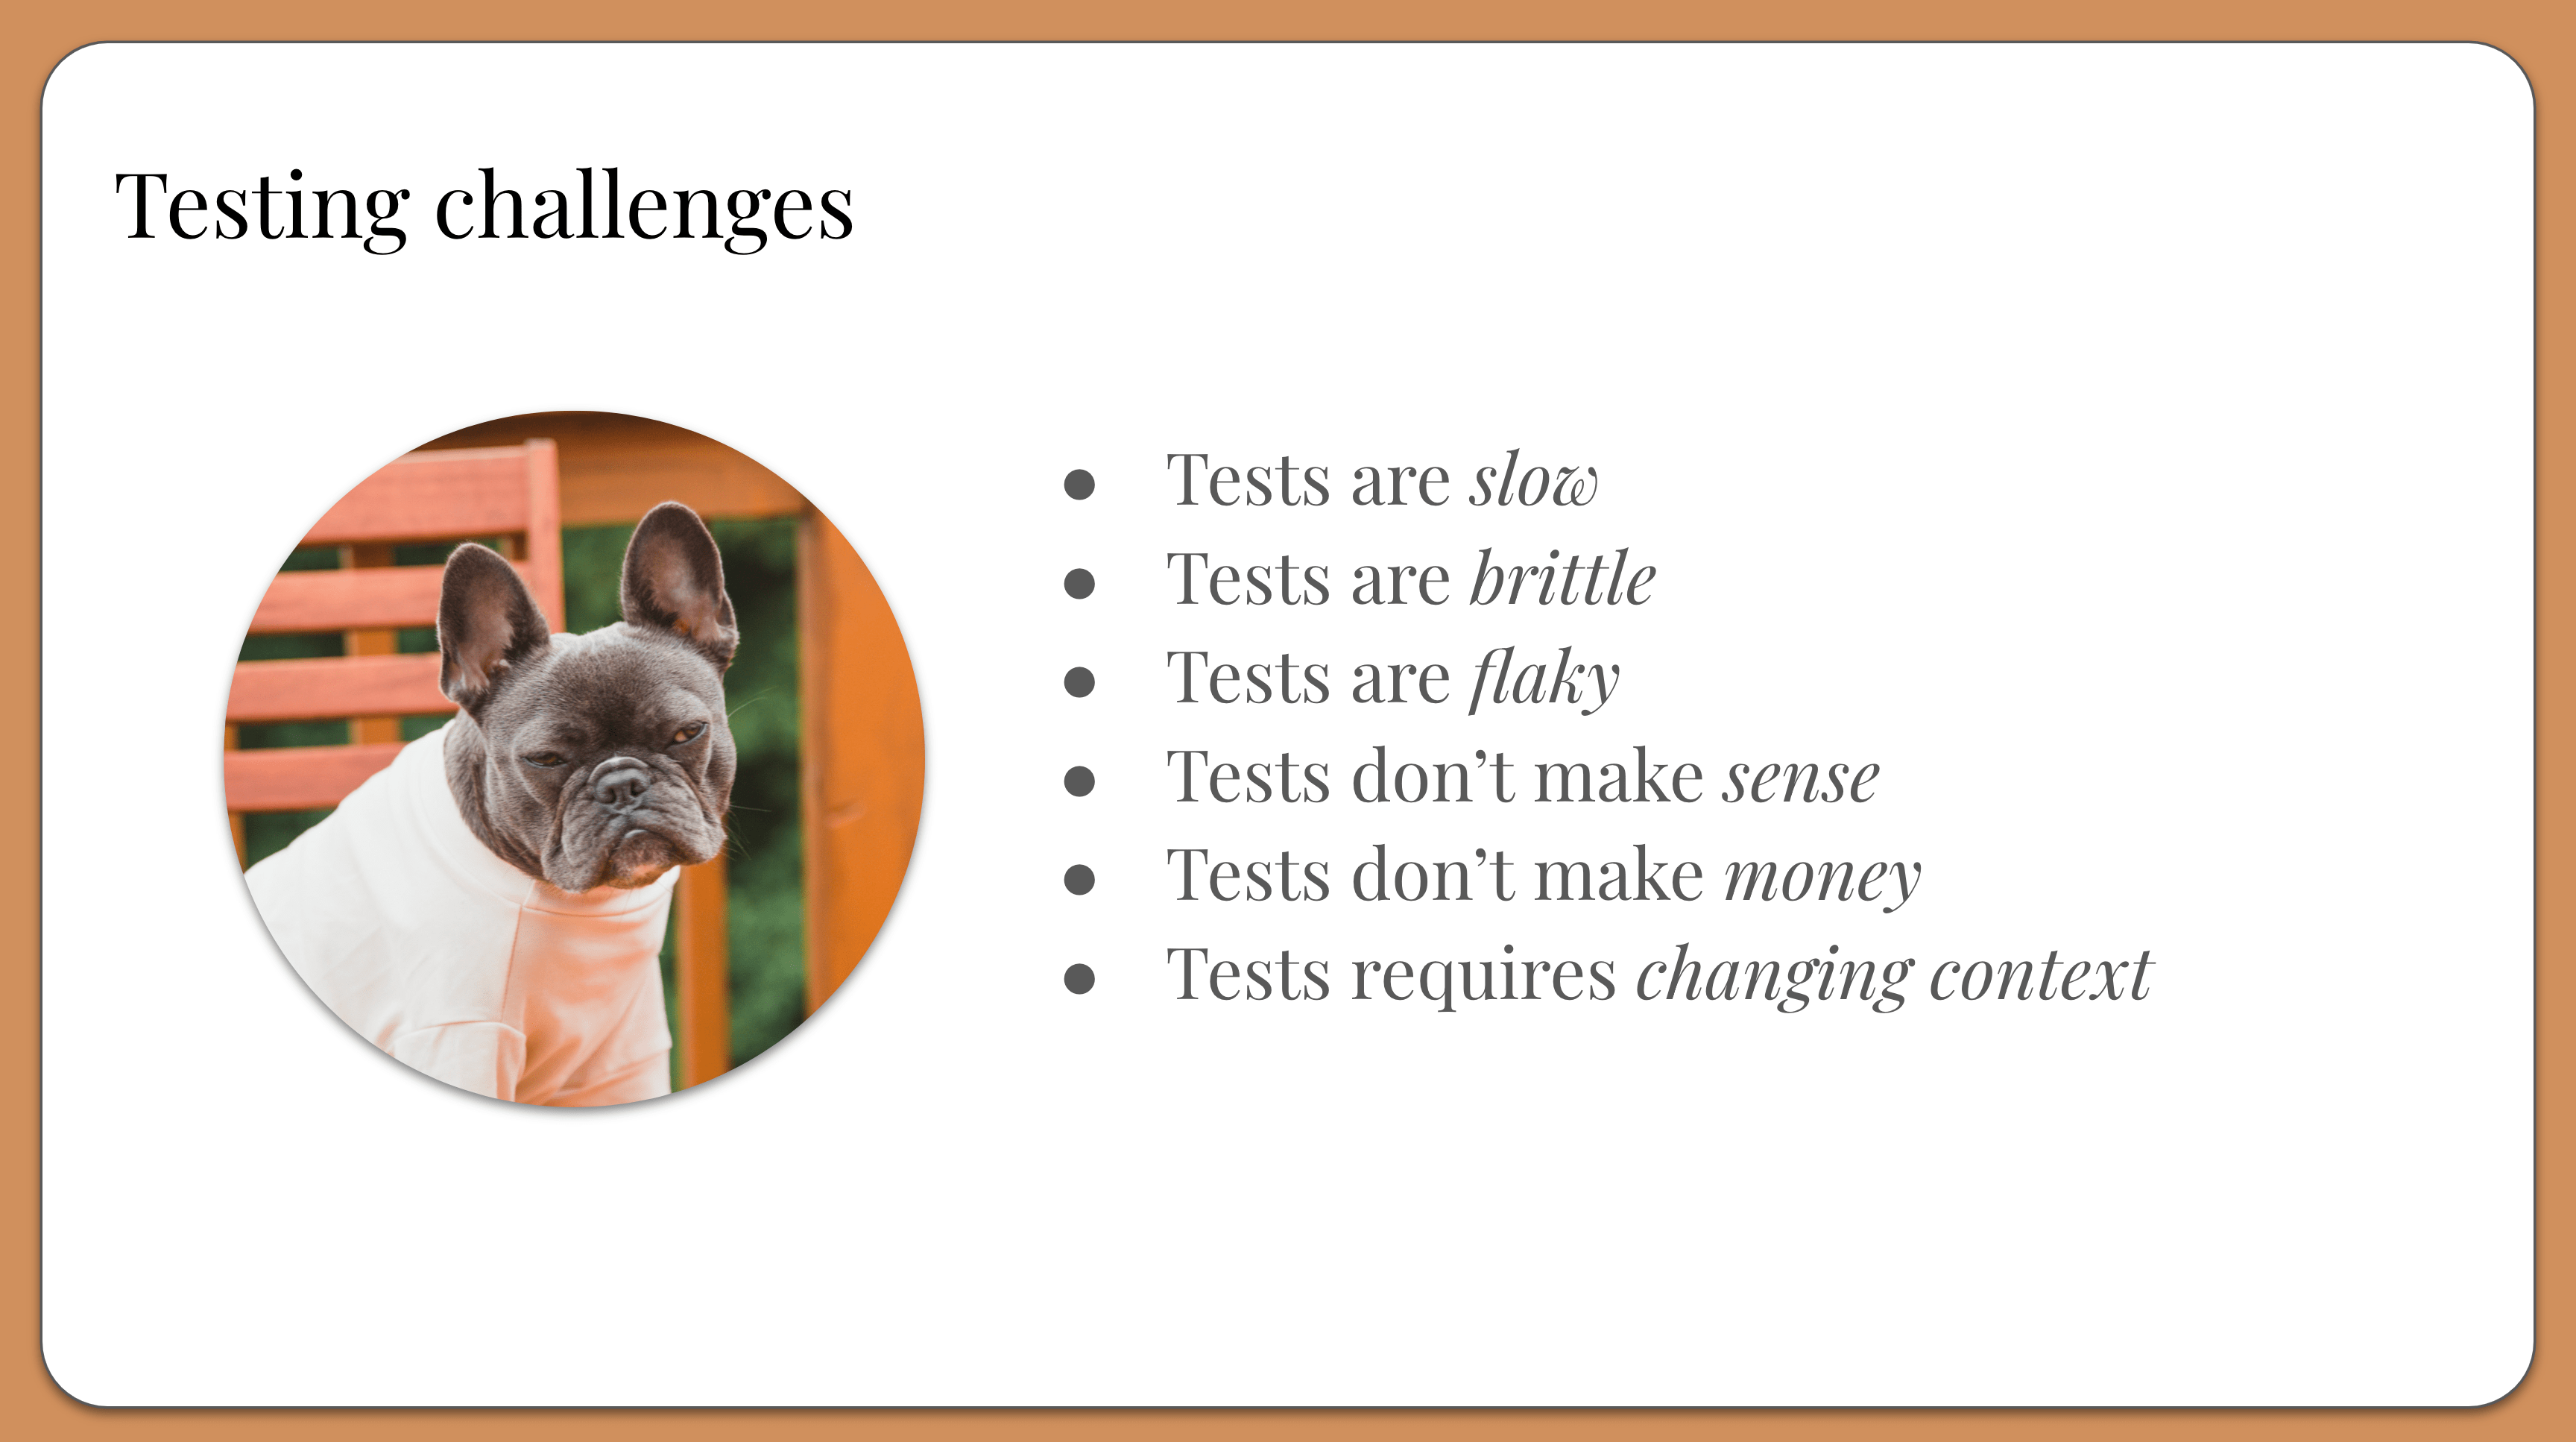
Why doesn’t everyone like to do testing? Testing is HARD! Here are common complaints I hear:
Tests are slow – they take too long to run!
Tests are brittle – they break whenever the app changes!
Tests are flaky – they crash all the time!
Tests don’t make sense – they are complicated and unreadable!
Tests don’t make money – we could be building new features instead!
Tests require changing context – they interrupt my development workflow!
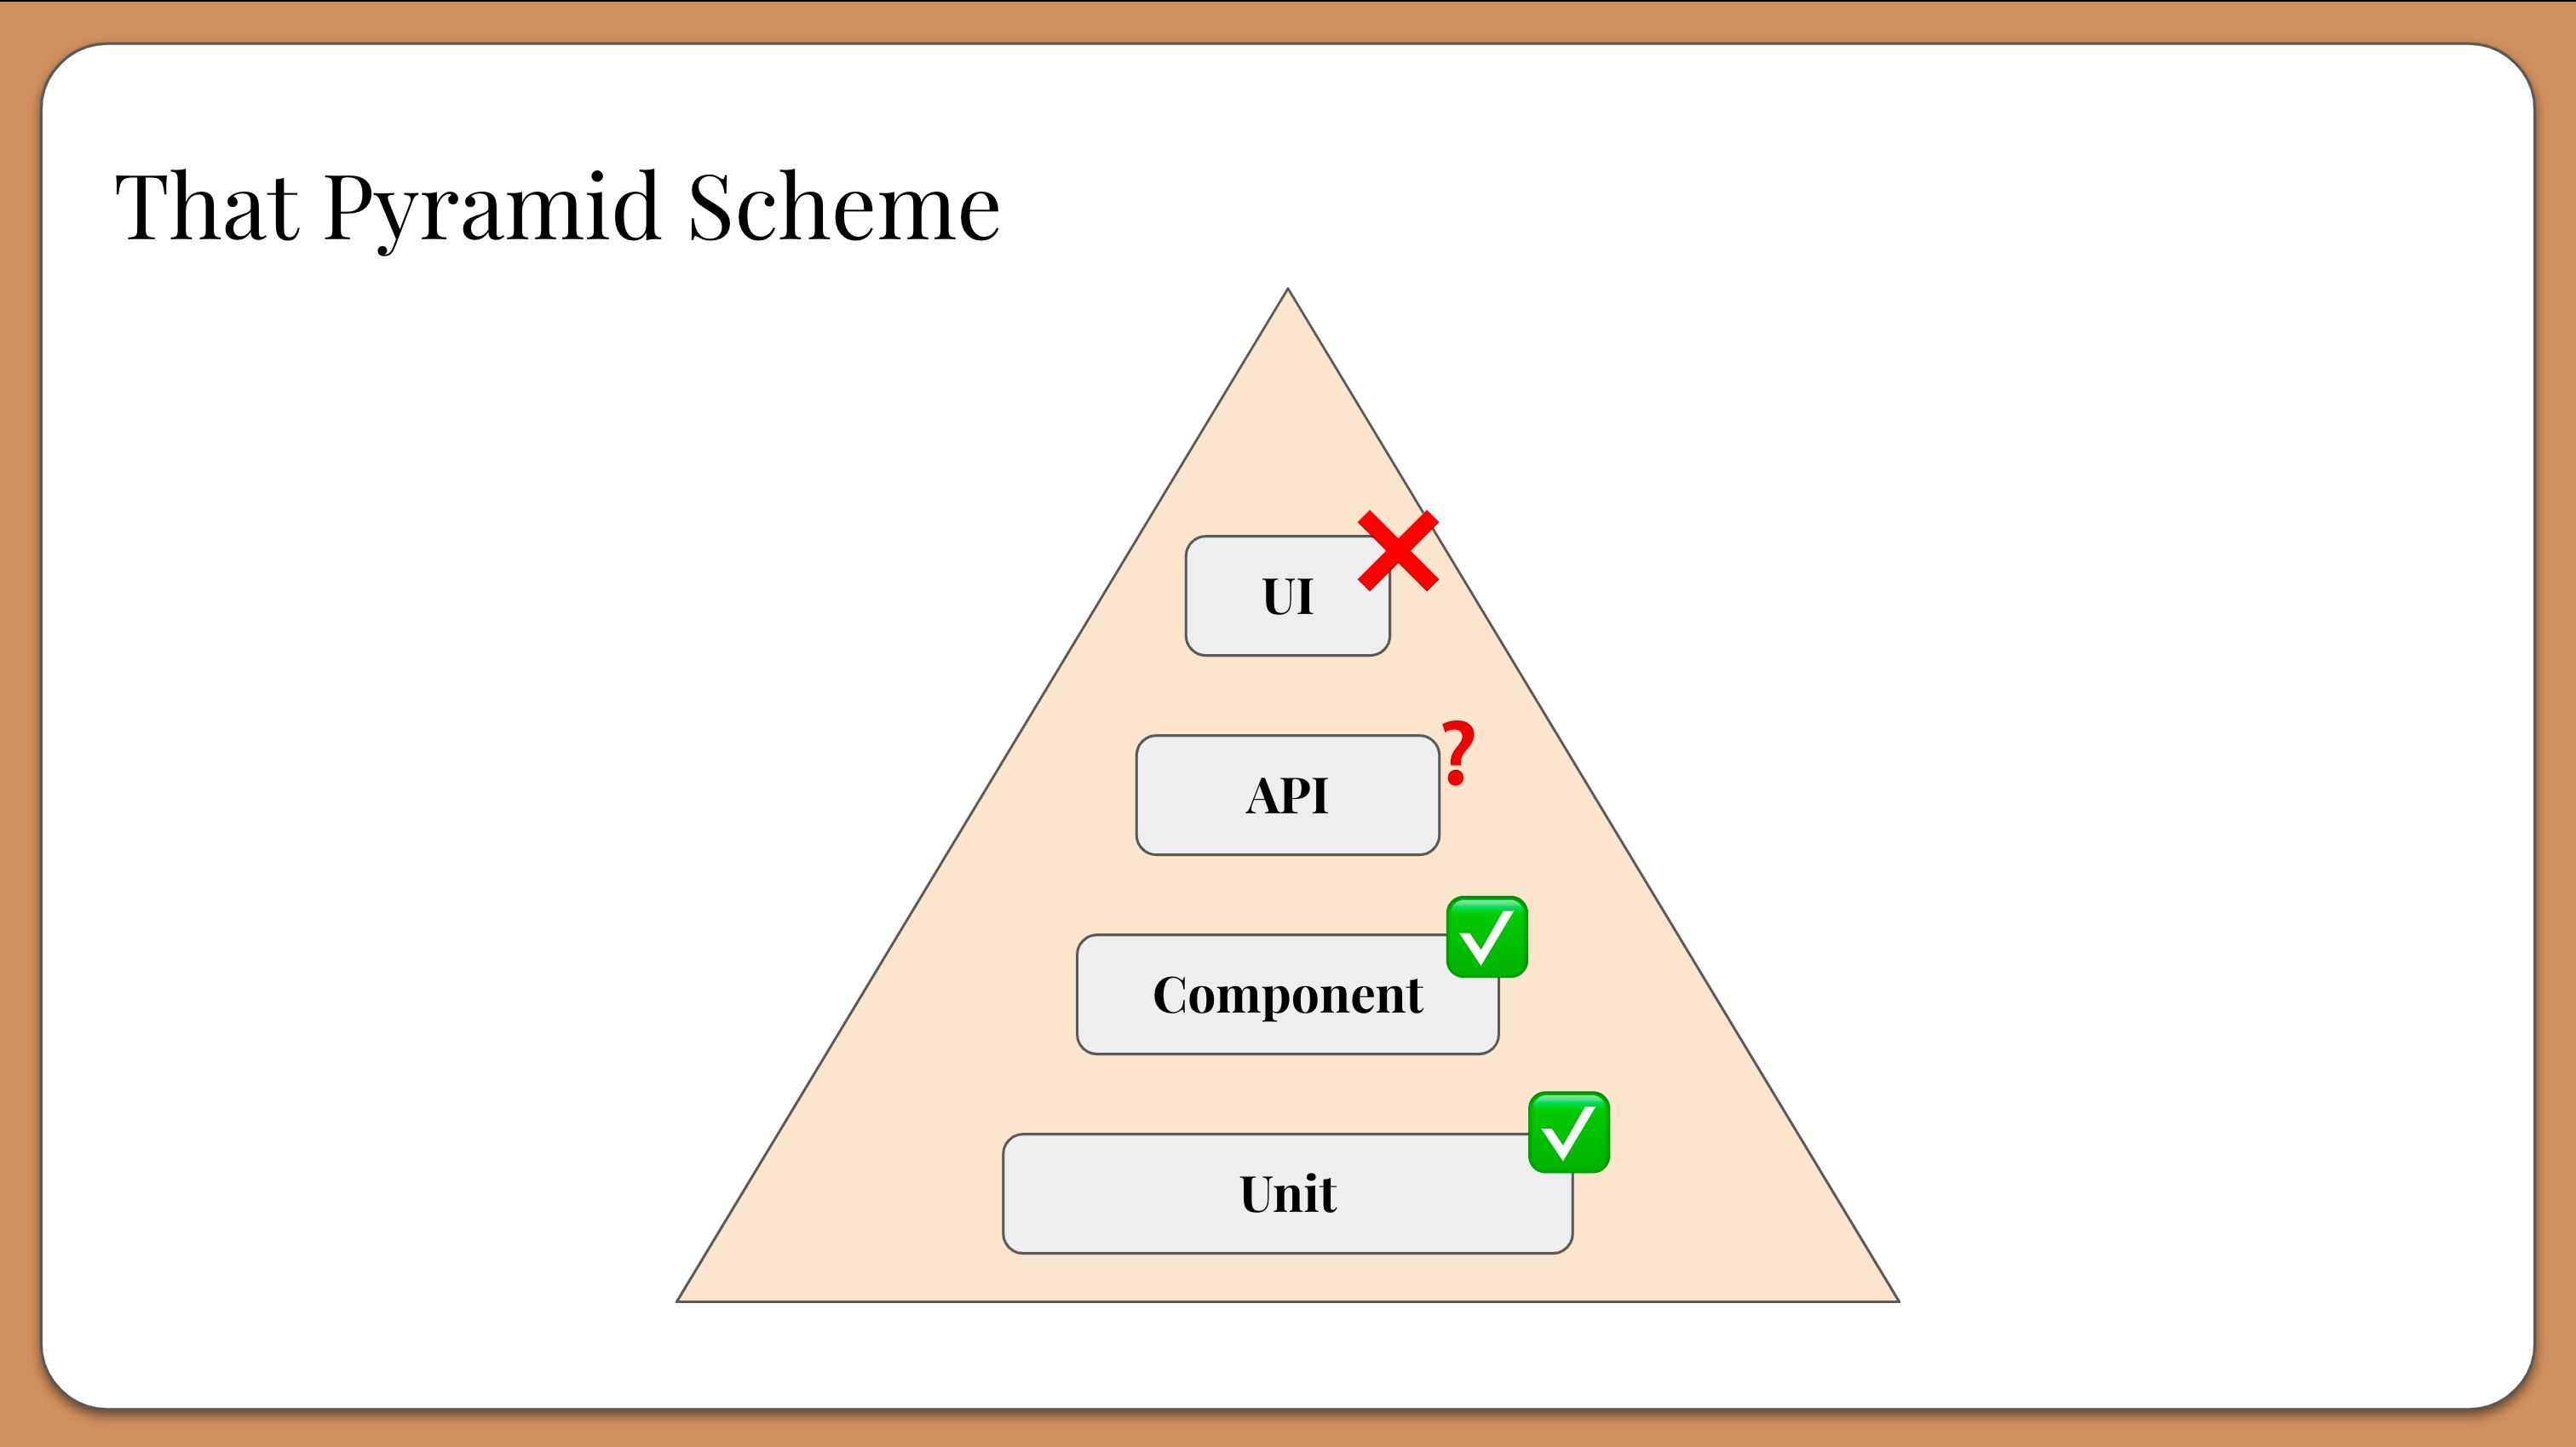
These are all valid reasons. To mitigate these pain points, software teams have historically created testing strategies around the Testing Pyramid, which separates tests by layer from top to bottom:
UI tests
API tests
Component tests
Unit tests
Tests at the bottom were considered “better” because they were closer to the code, easier to automate, and faster to execute. They were also considered to be less susceptible to flakiness and, therefore, easier to maintain. Tests at the top were considered just the opposite: big, slow, and expensive. The pyramid shape implied that teams should spent more time on tests at the base of the pyramid and less time on tests at the top.
End-to-end tests can be very valuable. Unfortunately, the Testing Pyramid labeled them as “difficult” and “bad” primarily due to poor practices and tool shortcomings. It also led teams to form testing strategies that emphasized categories of tests over the feedback they delivered.
Rethinking modern web testing goals
Testing doesn’t need to be hard, and it doesn’t need to suffer from the problems of the past. We should take a fresh, new approach in testing modern web apps.
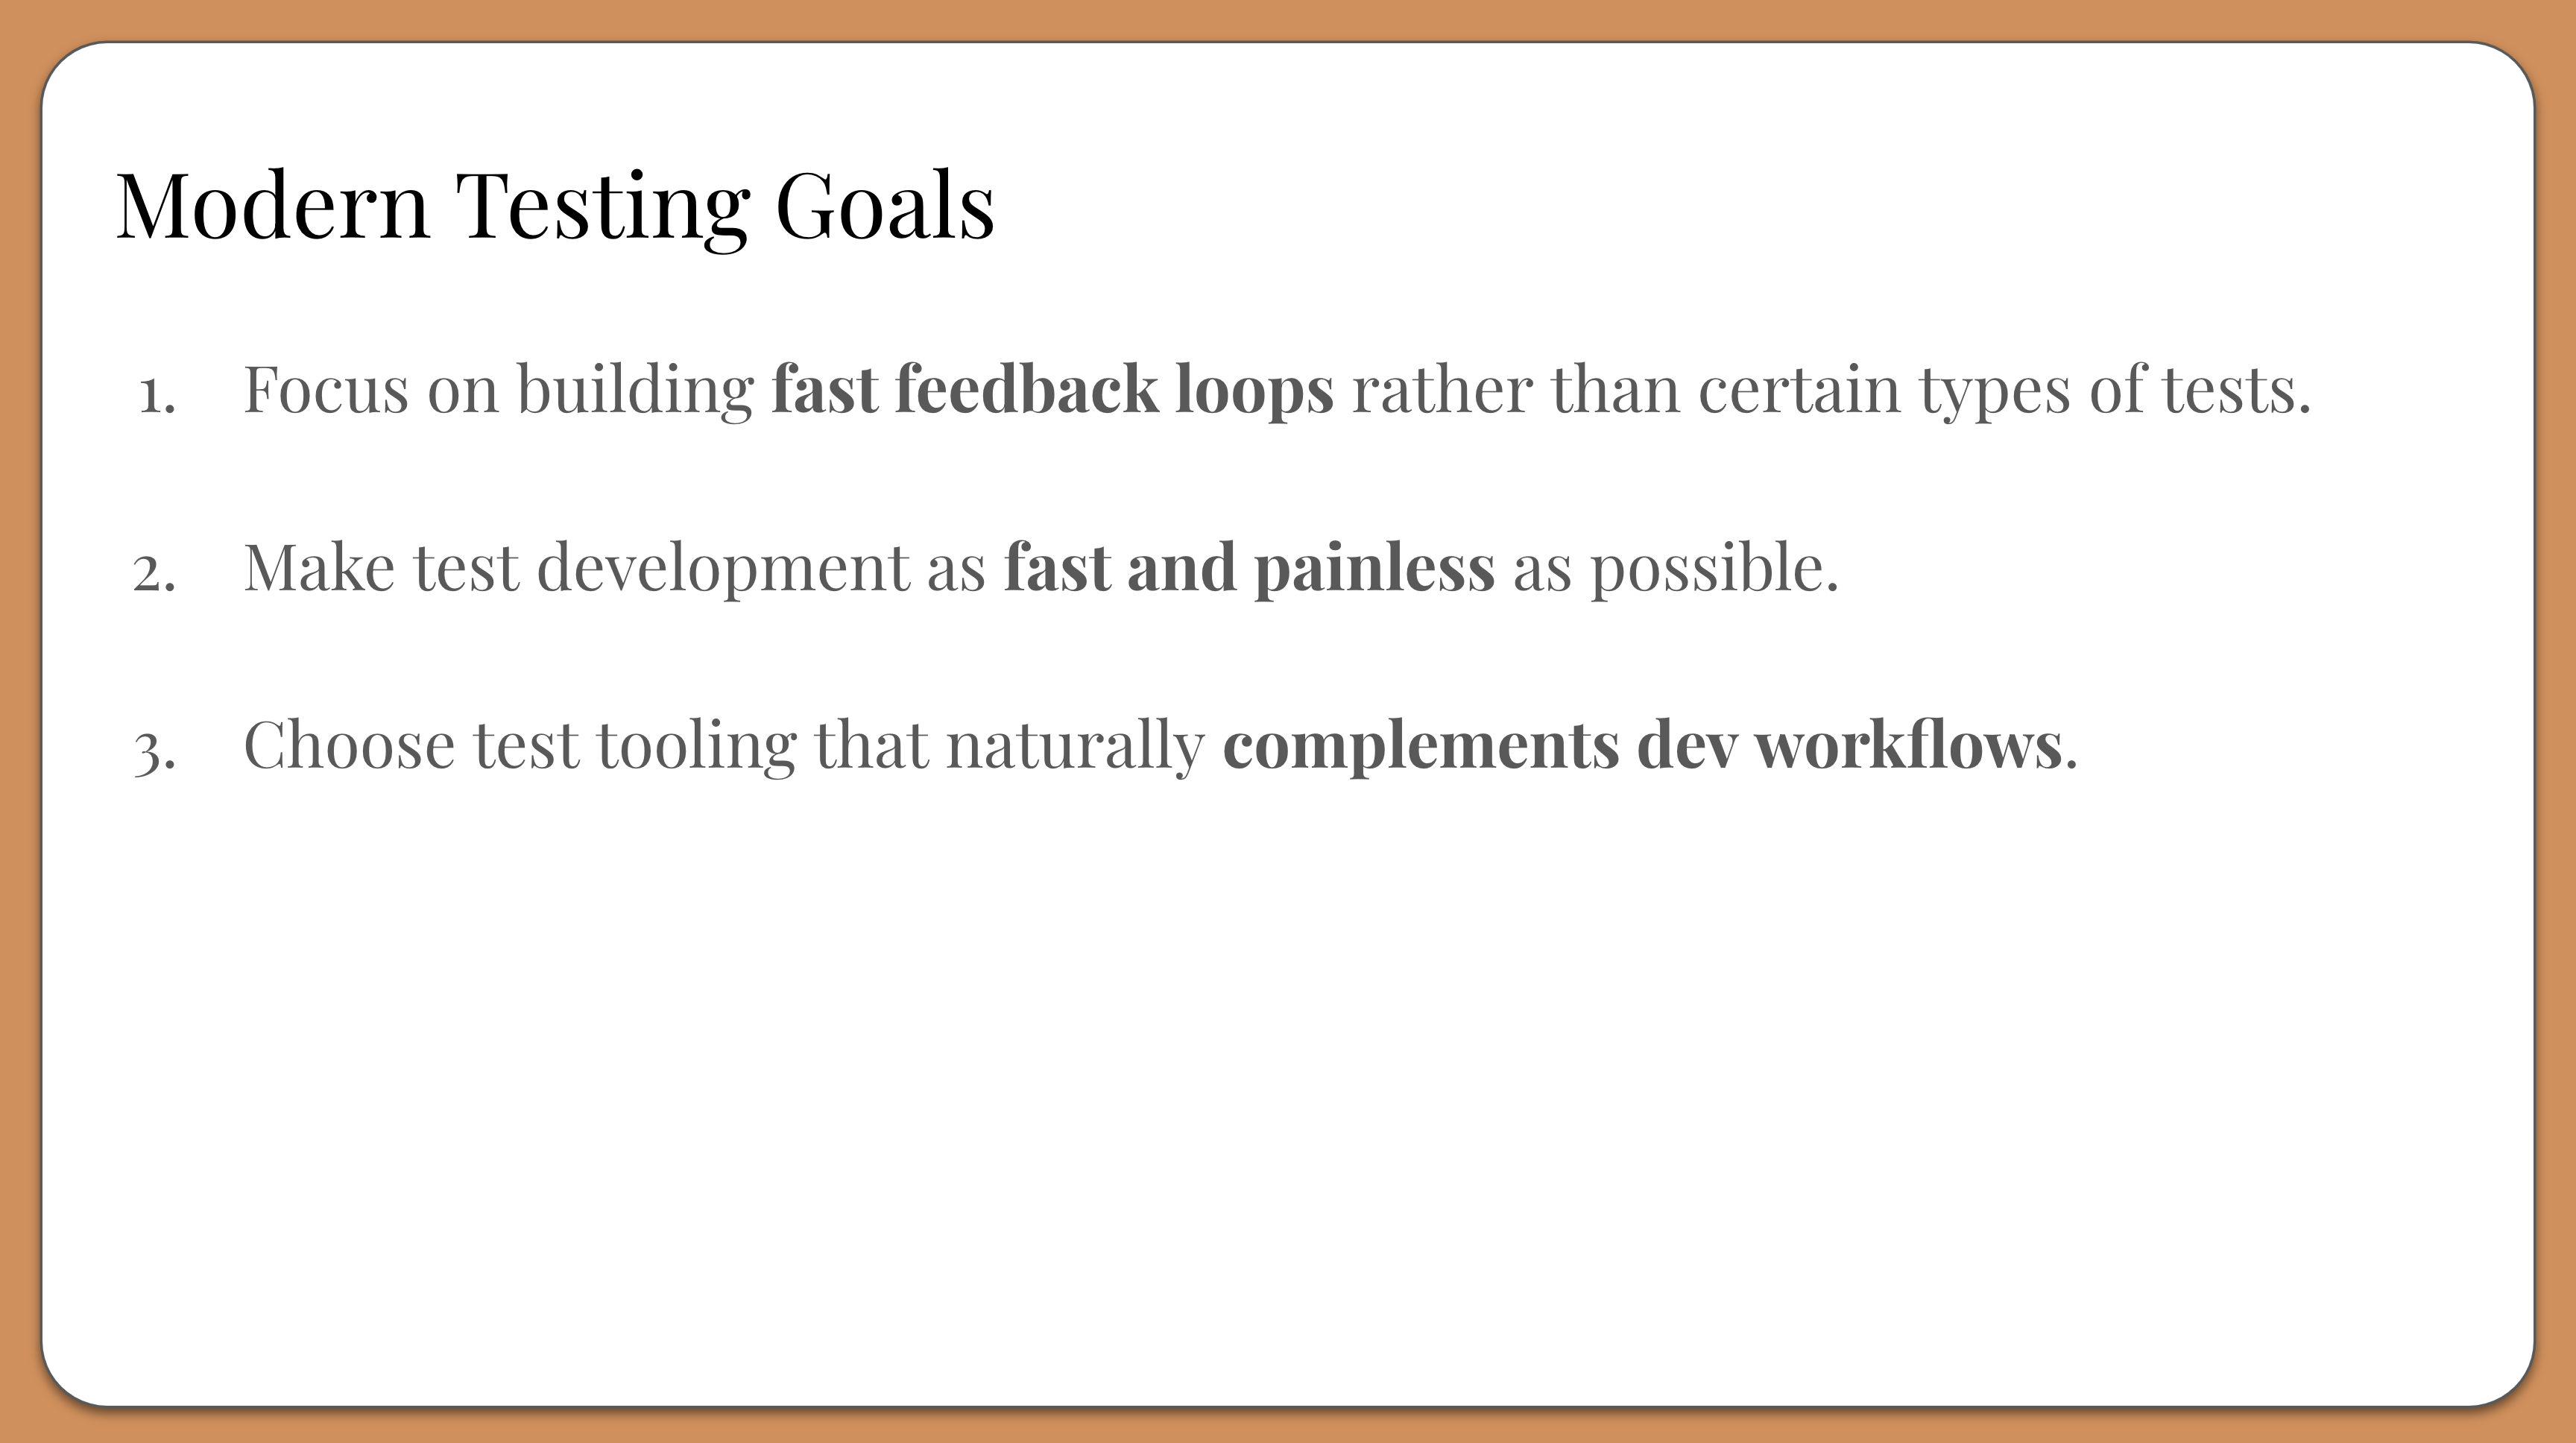
Here are three major goals for modern web testing:
Focus on building fast feedback loops rather than certain types of tests.
Make test development as fast and painless as possible.
Choose test tooling that naturally complements dev workflows.
These goals put emphasis on results and efficiency. Testing should just be a natural part of development without any friction.
Introducing Playwright
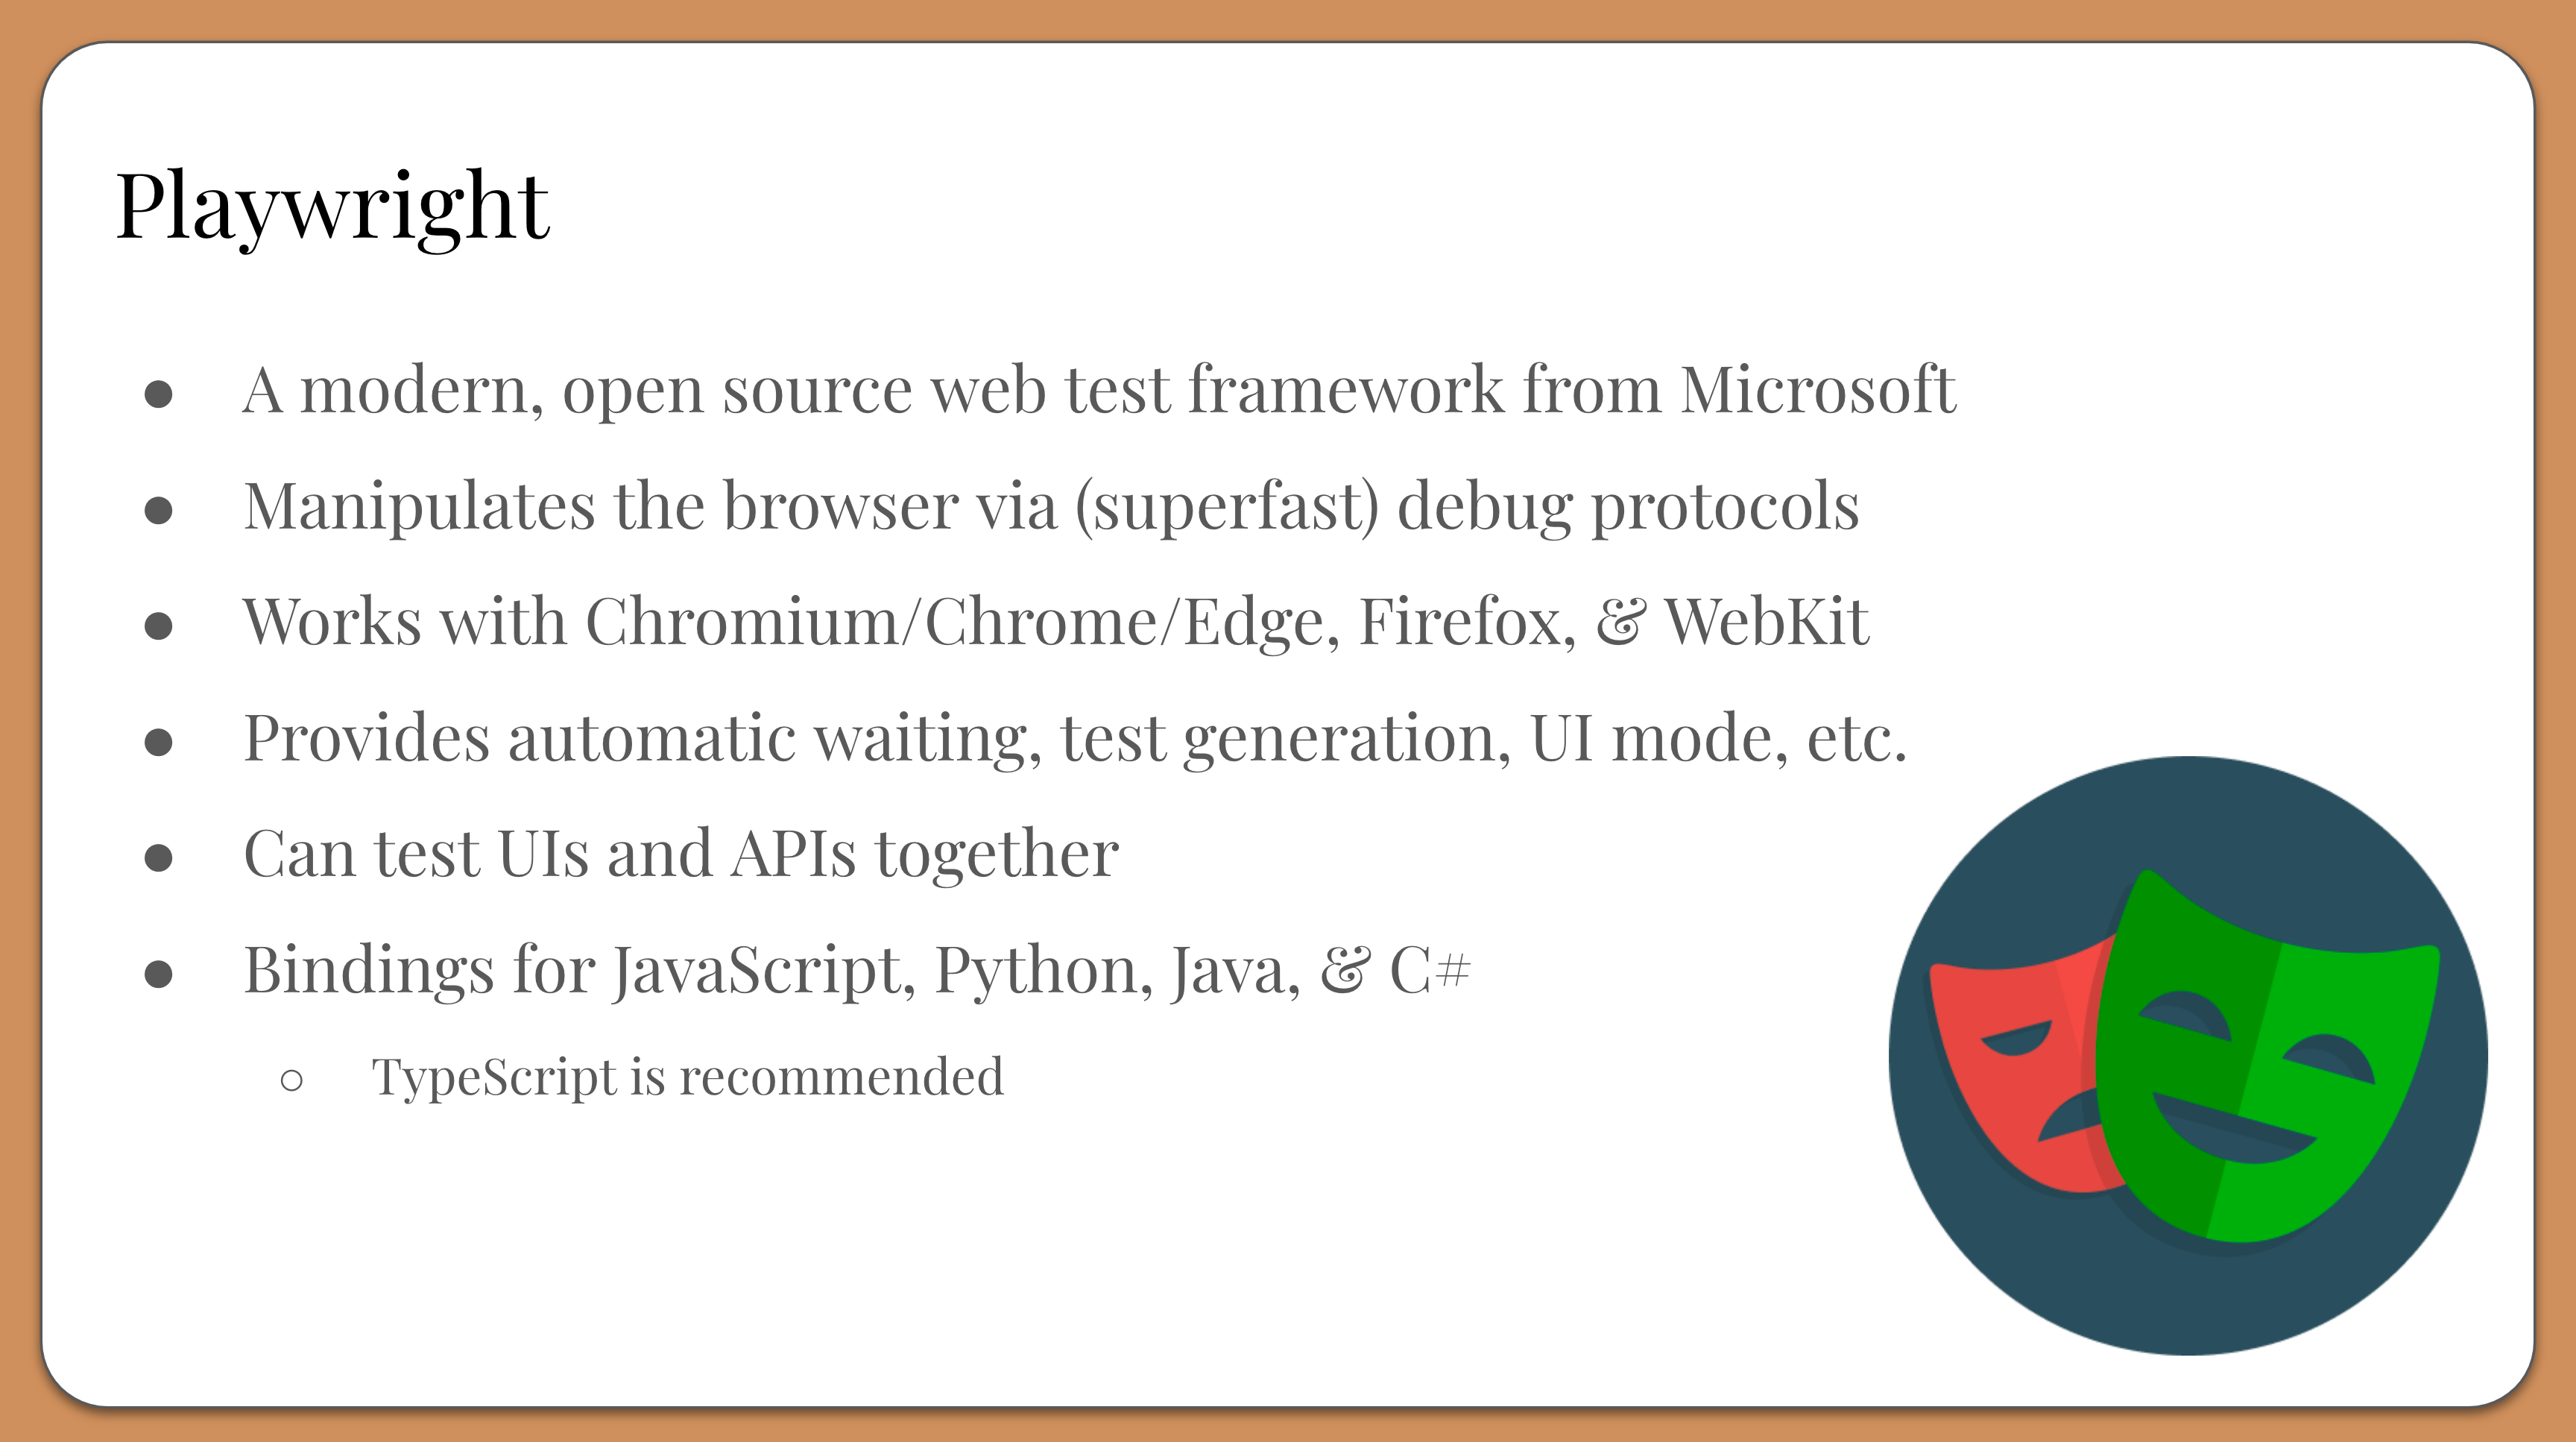
Playwright is a modern web testing framework that can help us meet these goals.
It is an open source project from Microsoft.
It manipulates the browser via (superfast) debug protocols
It works with Chromium/Chrome/Edge, Firefox, and WebKit
It provides automatic waiting, test generation, UI mode, and more
It can test UIs and APIs together
It provides bindings for JavaScript/TypeScript, Python, Java, and C#
Playwright takes a unique approach to browser automation. First of all, it uses browser projects rather than full browser apps. For example, this means you would test Chromium instead of Google Chrome. Browser projects are smaller and don’t use as many resources as full browsers. Playwright also manages the browser projects for you, so you don’t need to install extra stuff.
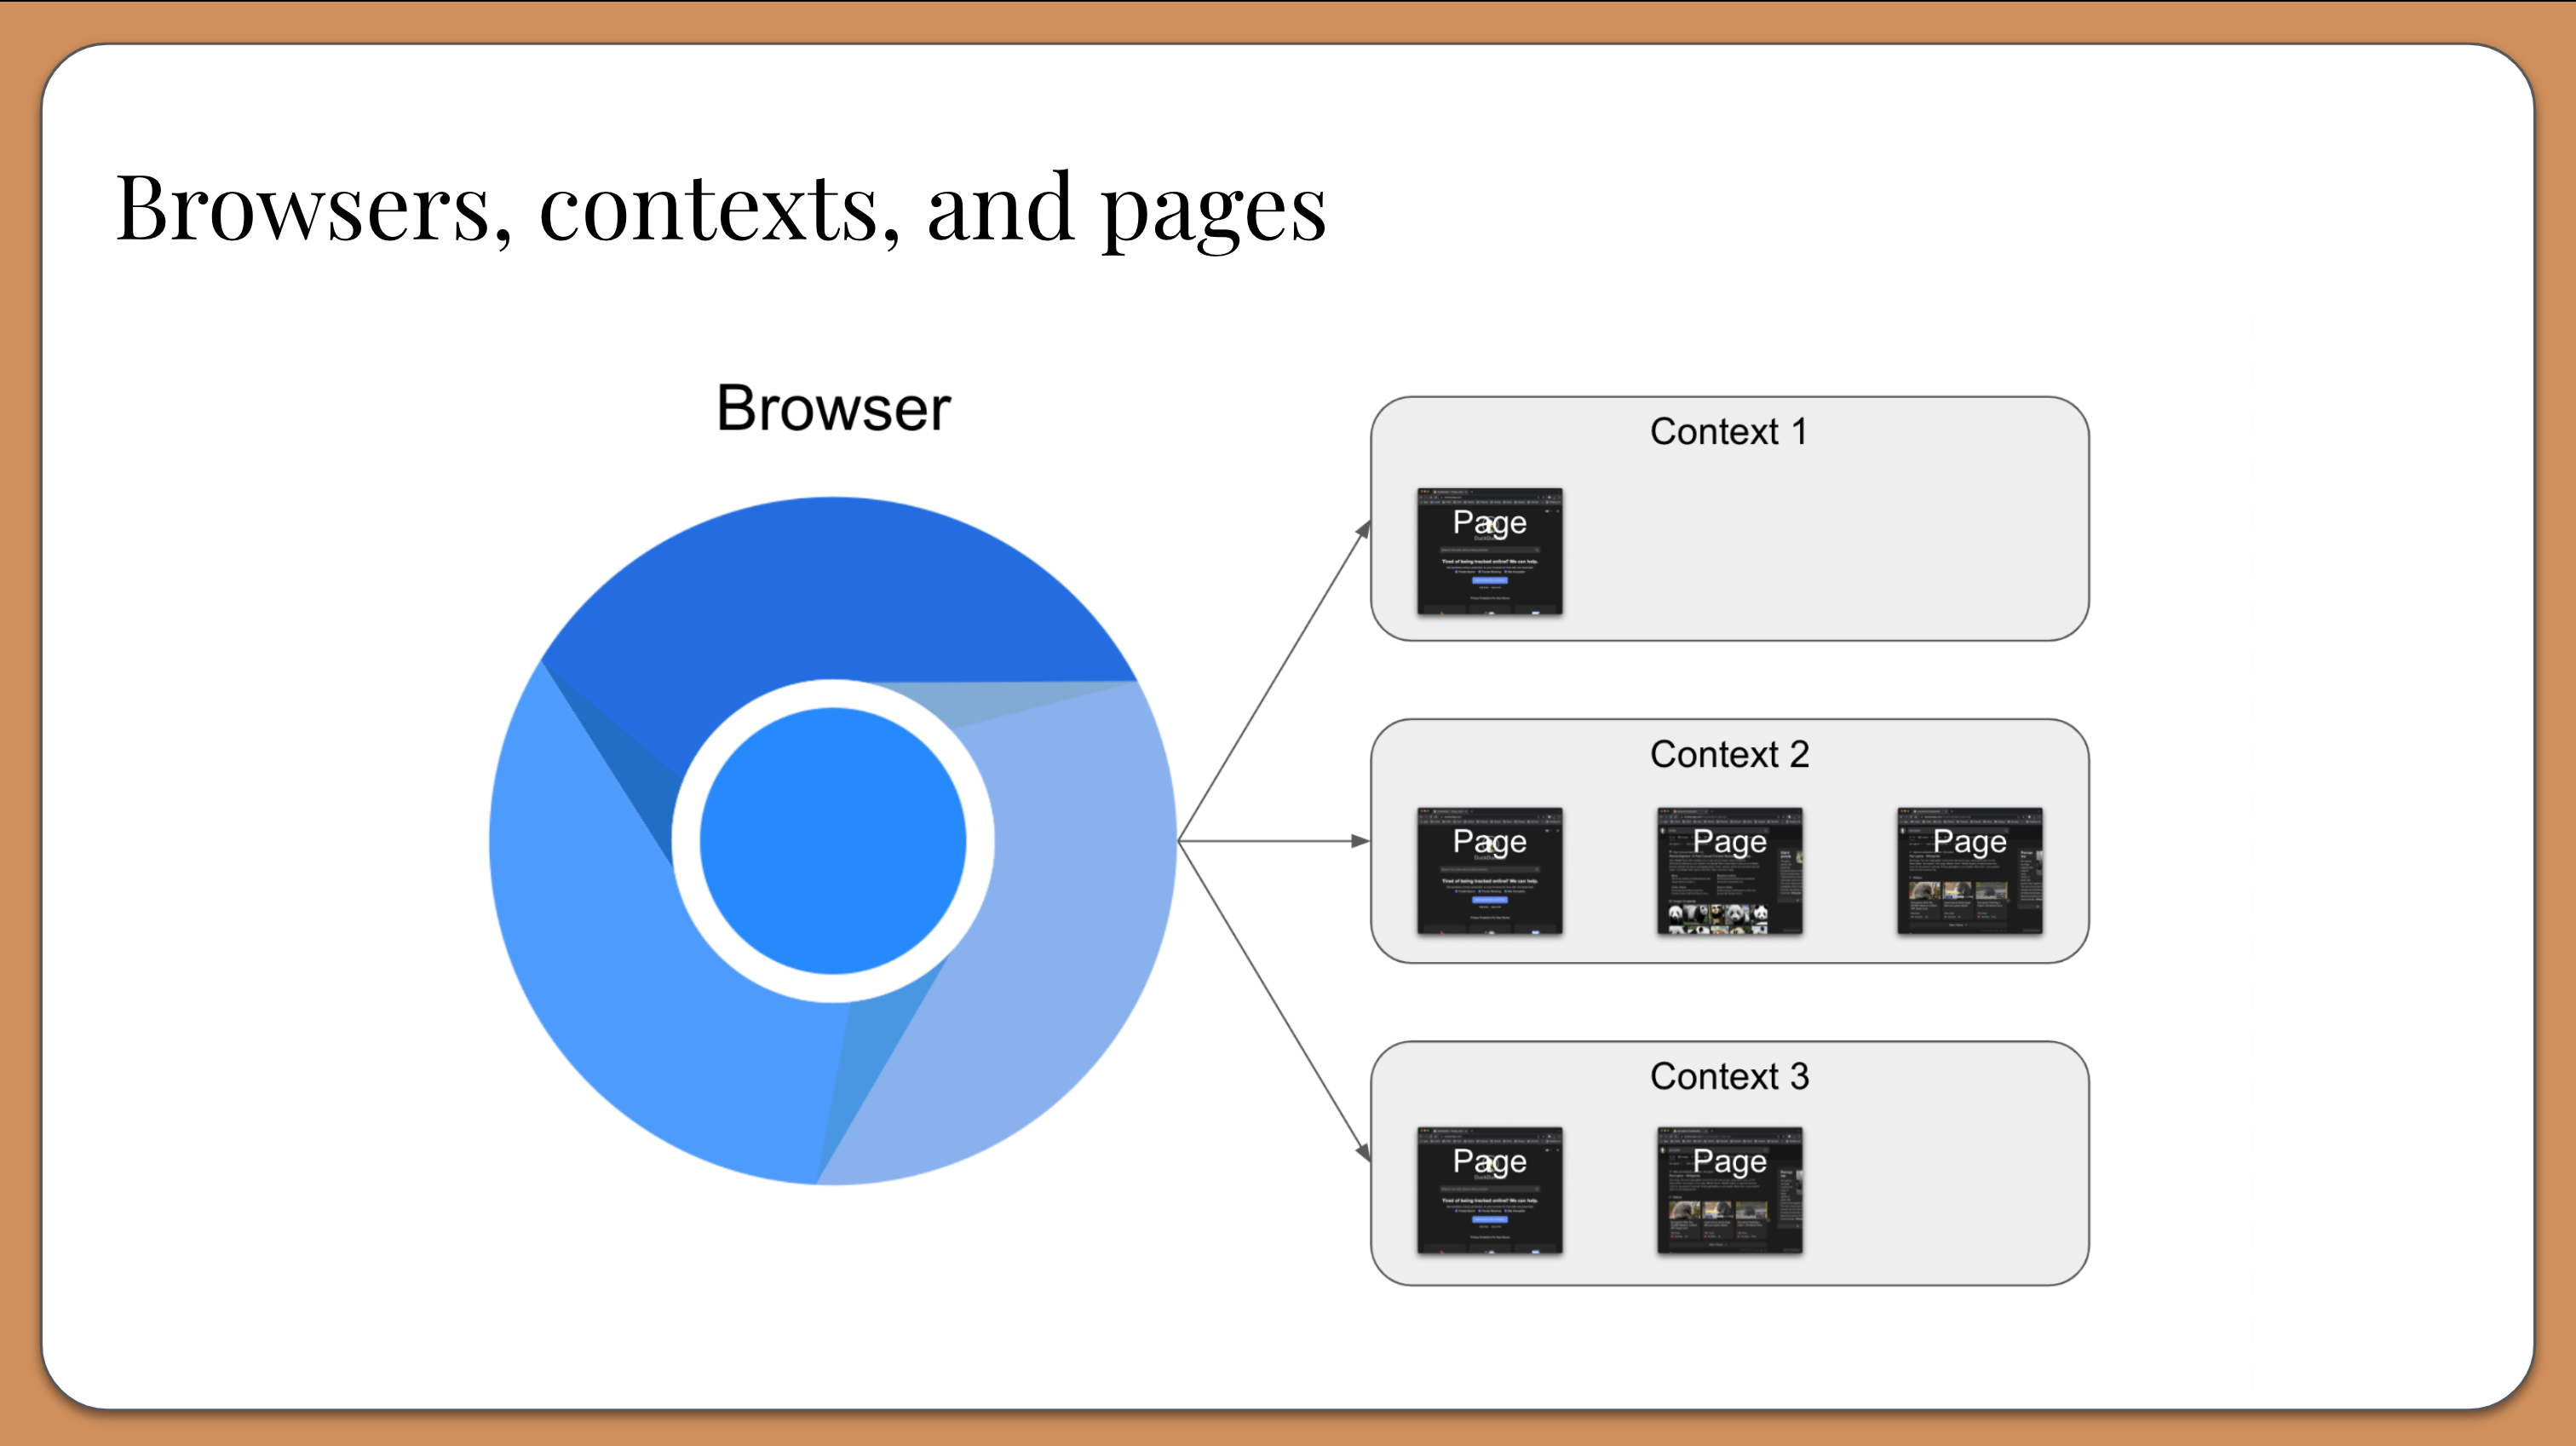
Second, it uses browsers very efficiently:
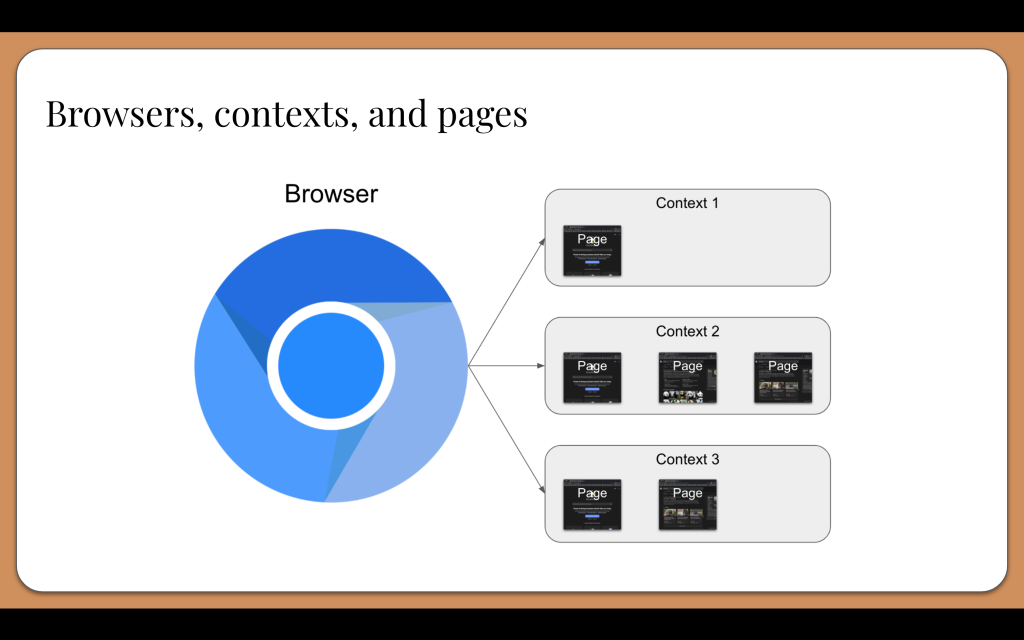
Instead of launching a full, new browser instance for each test, Playwright launches one browser instance for the entire suite of tests.
It then creates a unique browser context from that instance for each test. A browser context is essentially like an incognito session: it has its own session storage and tabs that are not shared with any other context. Browser contexts are very fast to create and destroy.
Then, each browser context can have one or more pages. All Playwright interactions happen through a page, like clicks and scrapes. Most tests only ever need one page.
Playwright handles all this setup automatically for you.
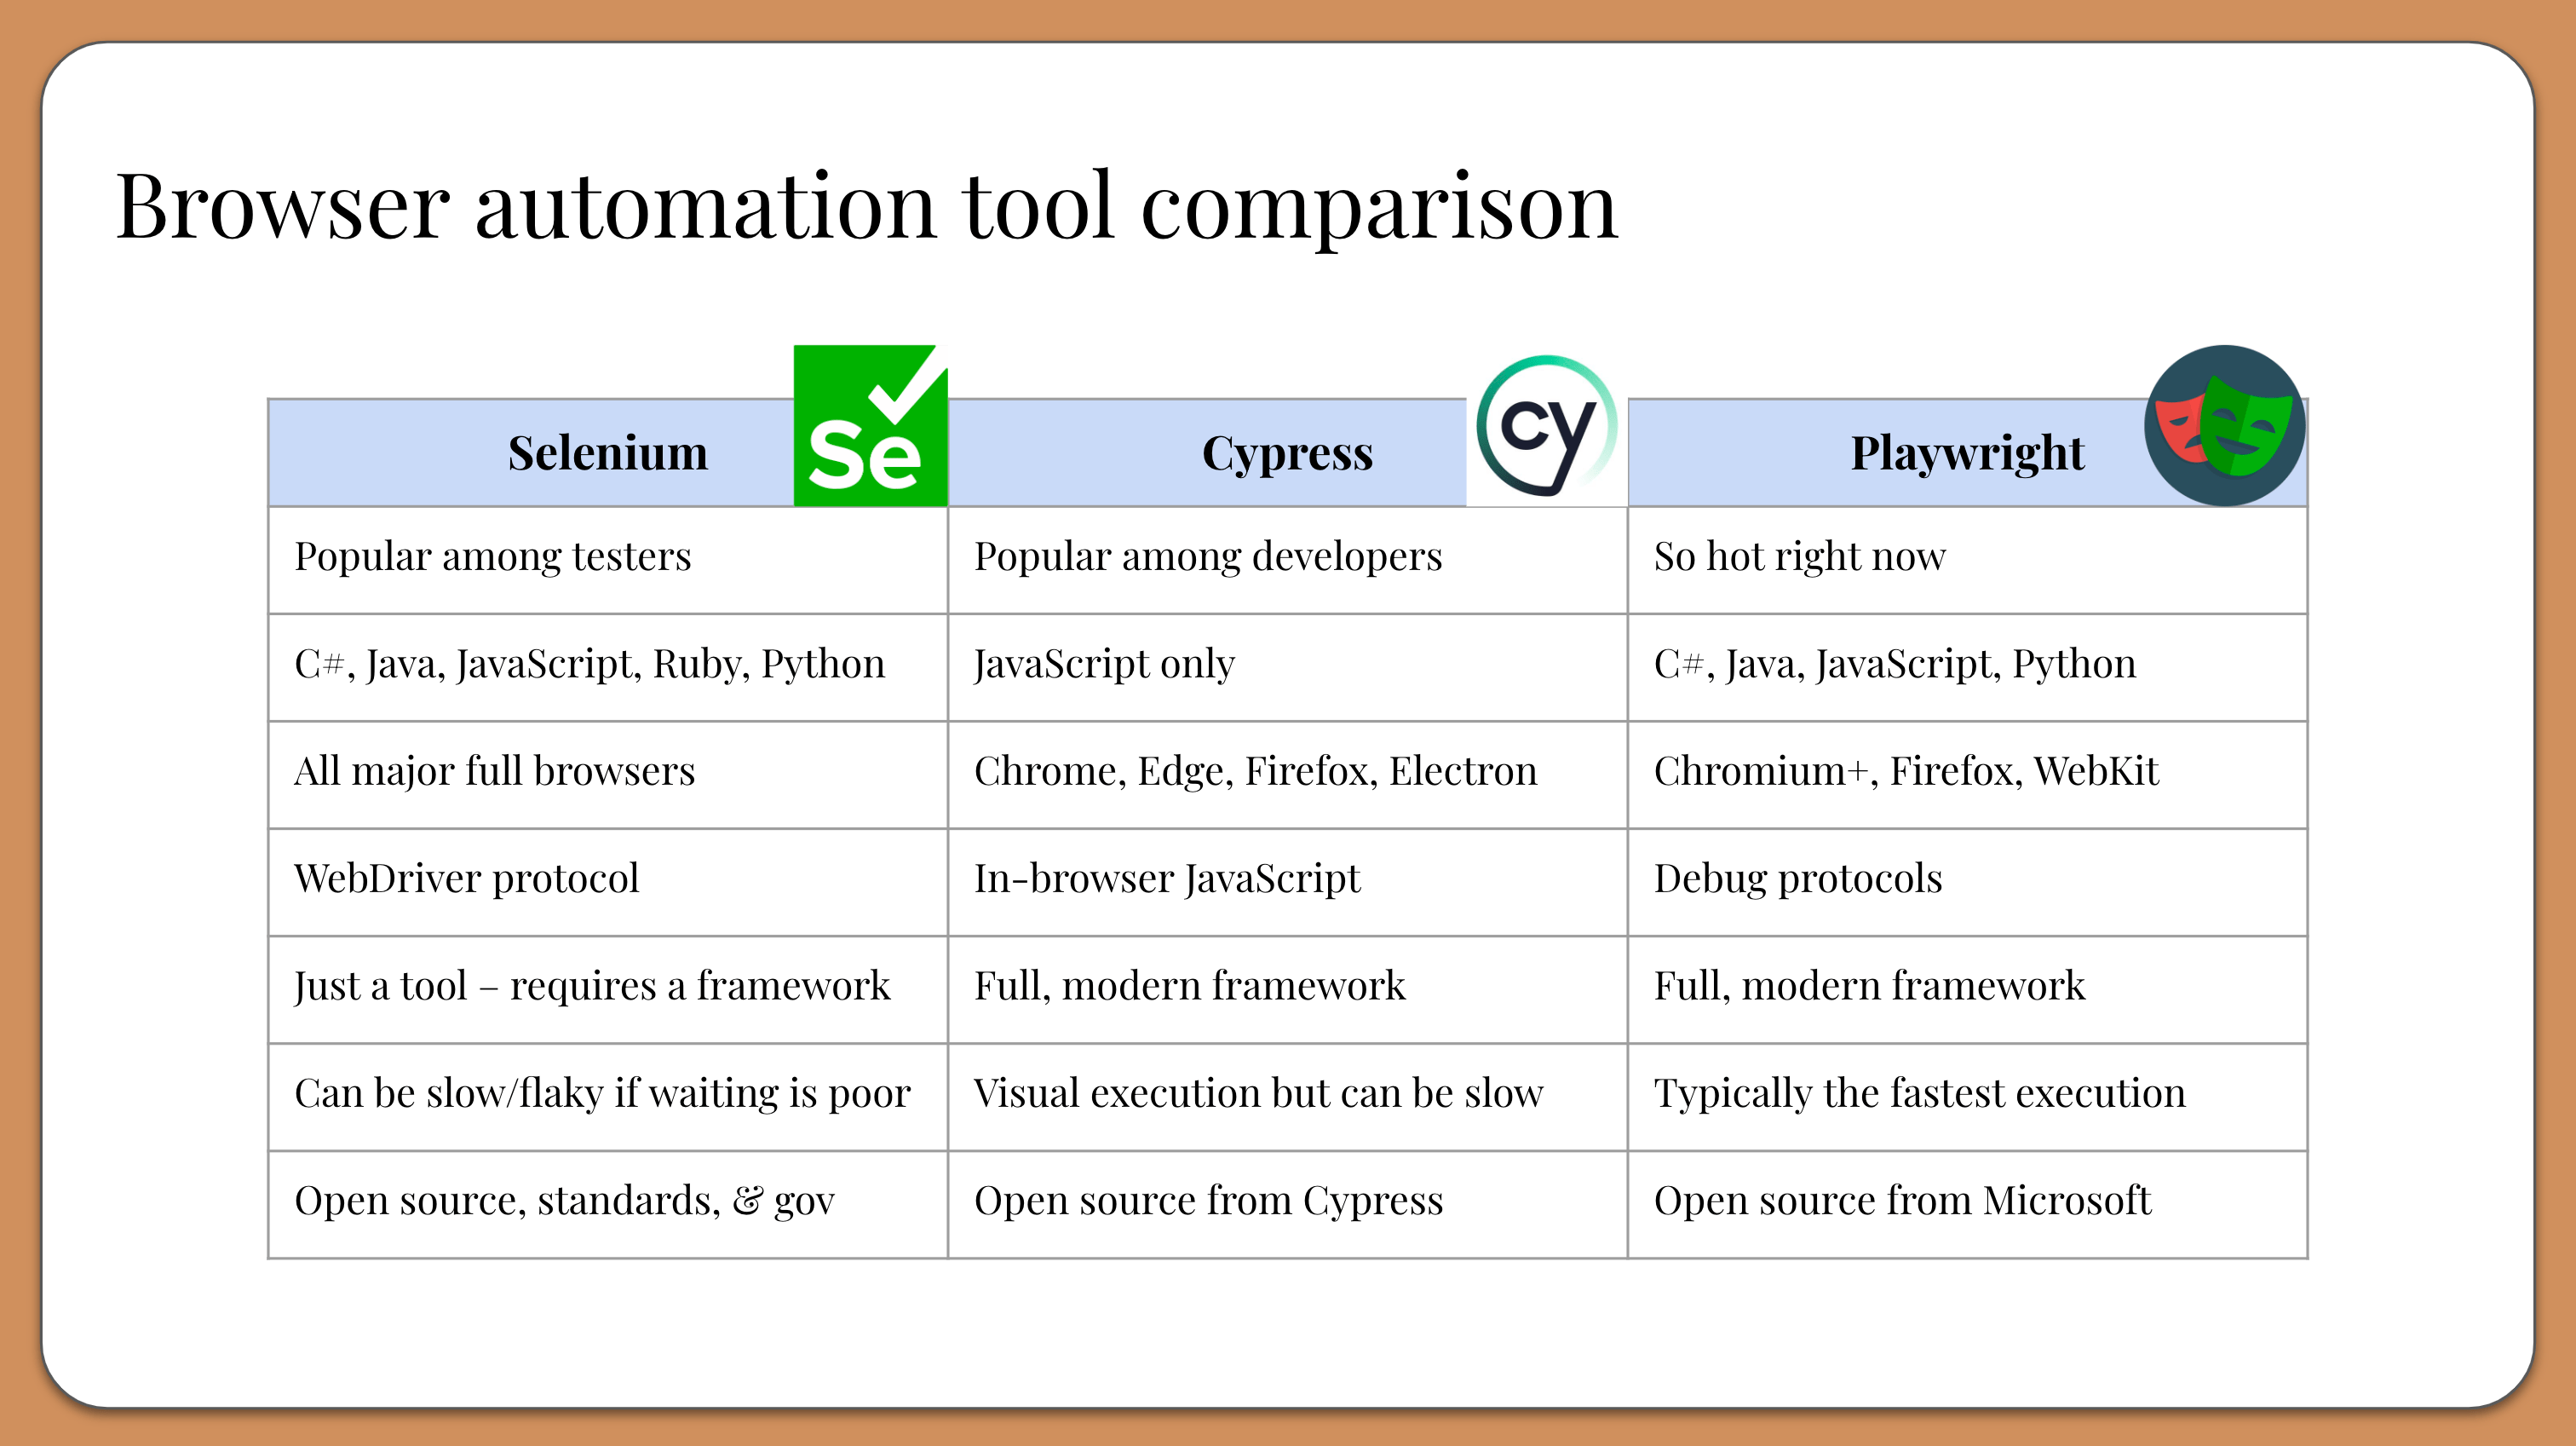
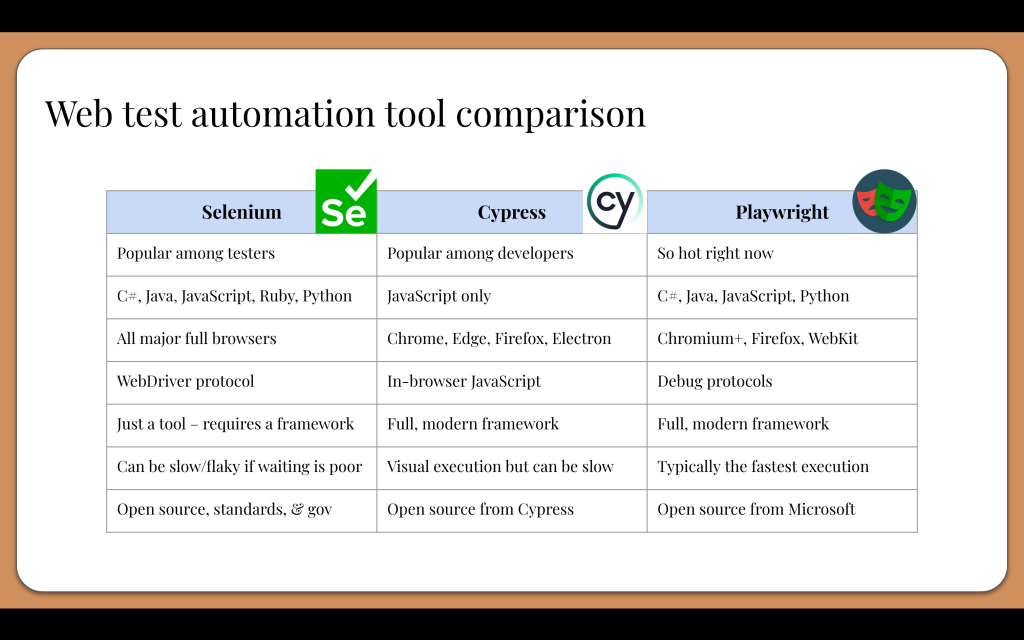
Comparing Playwright to other tools
Playwright is not the only browser automation tool out there. The other two most popular tools are Selenium and Cypress. Here is a chart with high-level comparisons:
All three are good tools, and each one has their advantages. Playwright’s main advantages are that offers excellent developer experience with the fastest execution time, multiple language bindings, and several quality-of-life features.
Learning Playwright
If you want to learn how to automate your web tests with Playwright, take my tutorial, Awesome Web Testing with Playwright. All instructions and example code for the tutorial are located in GitHub. This tutorial is designed to be self-guided, so give it a try!
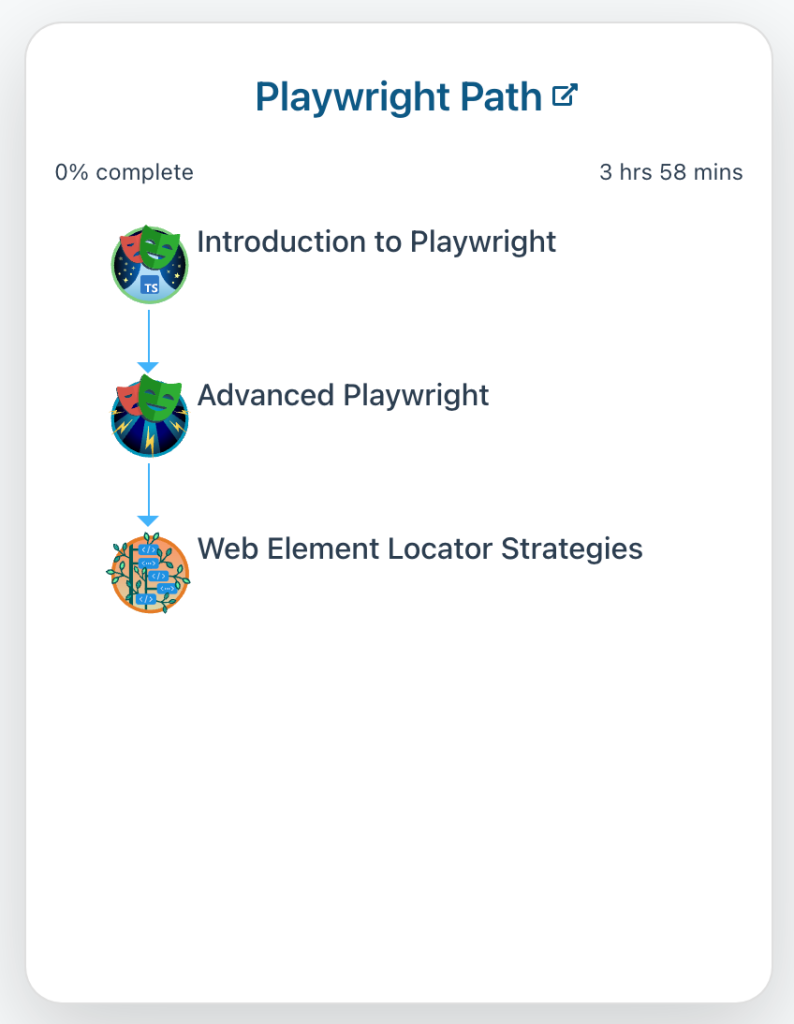
Test Automation University also has a Playwright learning path with introductory and advanced courses:
Playwright is an awesome new framework for modern web testing. Give it a try, and let me know what you automate!
This article is based on my talk at PyCon US 2023. The web app under test and most of the example code is written in Python, but the information presented is applicable to any stack.
There are several great tools and frameworks for automating browser-based web UI testing these days. Personally, I gravitate towards open source projects that require coding skills to use, rather than low-code/no-code automation tools. The big three browser automation tools right now are Selenium, Cypress, and Playwright. There are other great tools, too, but these three seem to be the ones everyone is talking about the most.
It can be tough to pick right right tool for your needs. In this article, let’s compare and contrast these tools.
If you want to run it locally, all you need is Python!
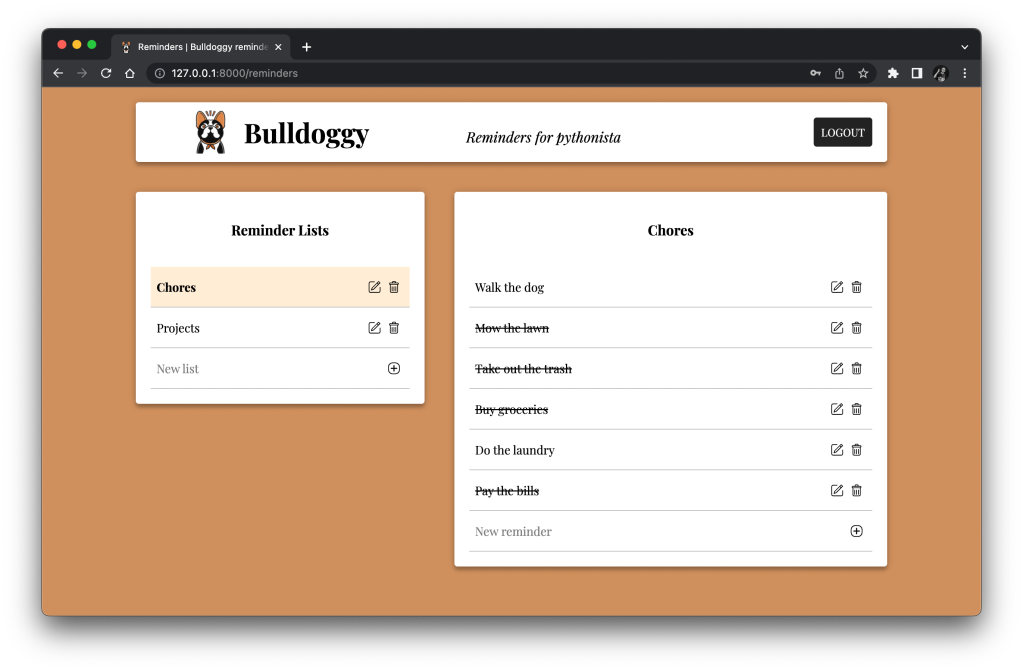
The app is pretty simple. When you first load it, it presents a standard login page. I actually used ChatGPT to help me write the HTML and CSS:
After logging in, you’ll see the reminders page:
The title card at the top has the app’s name, the logo, and a logout button. On the left, there is a card for reminder lists. Here, I have different lists for Chores and Projects. On the right, there is a card for all the reminders in the selected list. So, when I click the Chores list, I see reminders like “Buy groceries” and “Walk the dog.” I can click individual reminder rows to strike them out, indicating that they are complete. I can also add, edit, or delete reminders and lists through the buttons along the right sides of the cards.
Now that we have a web app to test, let’s learn how to use the big three web testing tools to automate tests for it.
Selenium
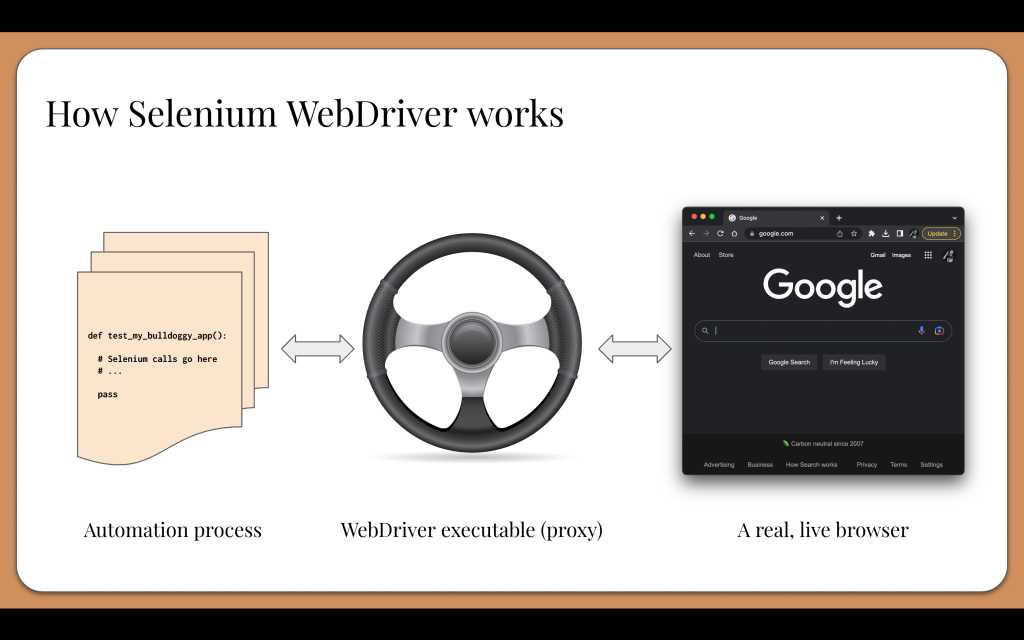
Selenium WebDriver is the classic and still the most popular browser automation tool. It’s the original. It carries that old-school style and swagger. Selenium manipulates the browser using the WebDriver protocol, a W3C Recommendation that all major browsers have adopted. The Selenium project is fully open source. It relies on open standards, and it is run by community volunteers according to open governance policies. Selenium WebDriver offers language bindings for Java, JavaScript, C#, and – my favorite language – Python.
Selenium WebDriver works with real, live browsers through a proxy server running on the same machine as the target browser. When test automation starts, it will launch the WebDriver executable for the proxy and then send commands through it via the WebDriver protocol.
To set up Selenium WebDriver, you need to install the WebDriver executables on your machine’s system path for the browsers you intend to test. Make sure the versions all match!
Then, you’ll need to add the appropriate Selenium package(s) to your test automation project. The names for the packages and the methods for installation are different for each language. For example, in Python, you’ll probably run pip install selenium.
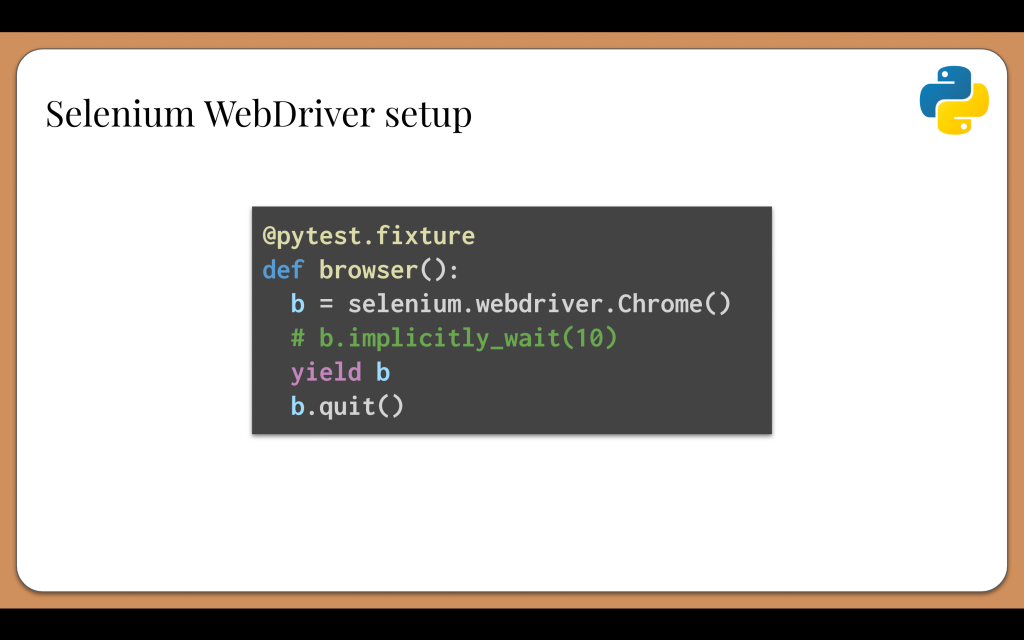
In your project, you’ll need to construct a WebDriver instance. The best place to do that is in a setup method within a test framework. If you are using Python with pytest, that would go into a fixture like this:
We could hardcode the browser type we want to use as shown here in the example, or we could dynamically pick the browser type based on some sort of test inputs. We may also set options on the WebDriver instance, such as running it headless or setting an implicit wait. For cleanup after the yield command, we need to explicitly quit the browser.
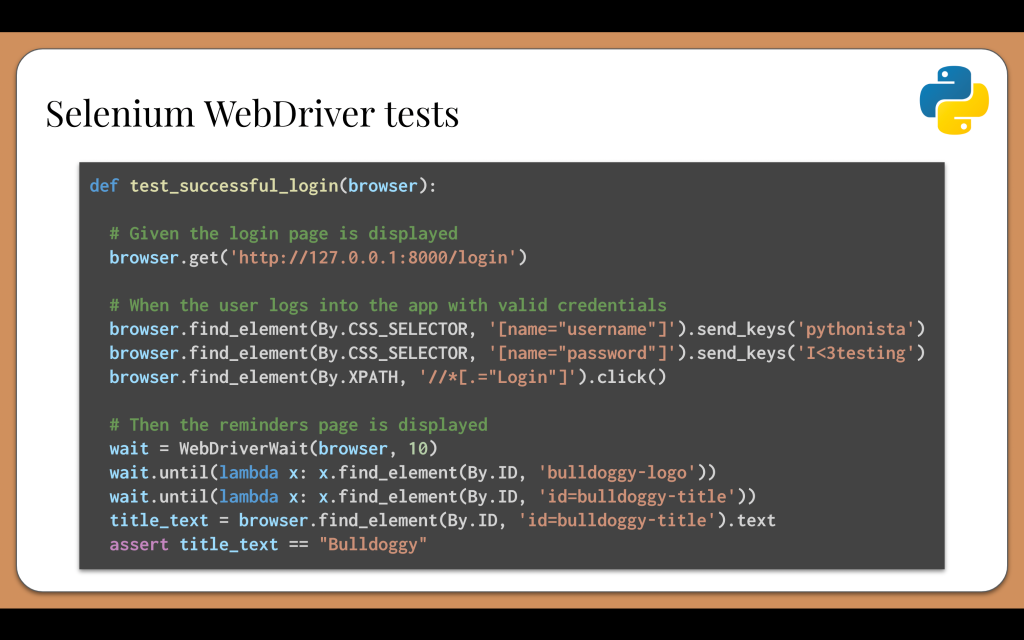
Here’s what a login test would look like when using Selenium in Python:
The test function would receive the WebDriver instance through the browser fixture we just wrote. When I write tests, I follow the Arrange-Act-Assert pattern, and I like to write my test steps using Given-When-Then language in comments.
The first step is, “Given the login page is displayed.” Here, we call “browser dot get” with the full URL for the Bulldoggy app running on the local machine.
The second step is, “When the user logs into the app with valid credentials.” This actually requires three interactions: typing the username, typing the password, and clicking the login button. For each of these, the test must first call “browser dot find element” with a locator to get the element object. They locate the username and password fields using CSS selectors based on input name, and they locate the login button using an XPath that searches for the text of the button. Once the elements are found, the test can call interactions on them like “send keys” and “click”.
Now, one thing to note is that these calls should probably use page objects or the Screenplay Pattern to make them reusable, but I chose to put raw Selenium code here to keep it basic.
The third step is, “Then the reminders page is displayed.” These lines perform assertions, but they need to wait for the reminders page to load before they can check any elements. The WebDriverWait object enables explicit waiting. With Selenium WebDriver, we need to handle waiting by ourselves, or else tests will crash when they can’t find target elements. Improper waiting is the main cause for flakiness in tests. Furthermore, implicit and explicit waits don’t mix. We must choose one or the other. Personally, I’ve found that any test project beyond a small demo needs explicit waits to be maintainable and runnable.
Selenium is great because it works well, but it does have some paint points:
Like we just said, there is no automatic waiting. Folks often write flaky tests unintentionally because they don’t handle waiting properly. Therefore, it is strongly recommended to use a layer on top of raw Selenium like Pylenium, SeleniumBase, or a Screenplay implementation. Selenium isn’t a full test framework by itself – it is a browser automation tool that becomes part of a test framework.
Selenium setup can be annoying. We need to install matching WebDriver executables onto the system path for every browser we test, and we need to keep their versions in sync. It’s very common to discover that tests start failing one day because a browser automatically updated its version and no longer matched its WebDriver executable. Thankfully, a new part of the Selenium project named Selenium Manager now automatically handles the executables.
Selenium-based tests have a bad reputation for slowness. Usually, poor performance comes more from the apps under test than the tool itself, but Selenium setup and cleanup do cause a performance hit.
Cypress
Cypress is a modern frontend test framework with rich developer experience. Instead of using the WebDriver protocol, it manipulates the browser via in-browser JavaScript calls. The tests and the app operate in the same browser process. Cypress is an open source project, and the company behind it sells advanced features for it as a paid service. It can run tests on Chrome, Firefox, Edge, Electron, and WebKit (but not Safari). It also has built-in API testing support. Unfortunately, due to its design, Cypress tests must be written exclusively in JavaScript (or TypeScript).
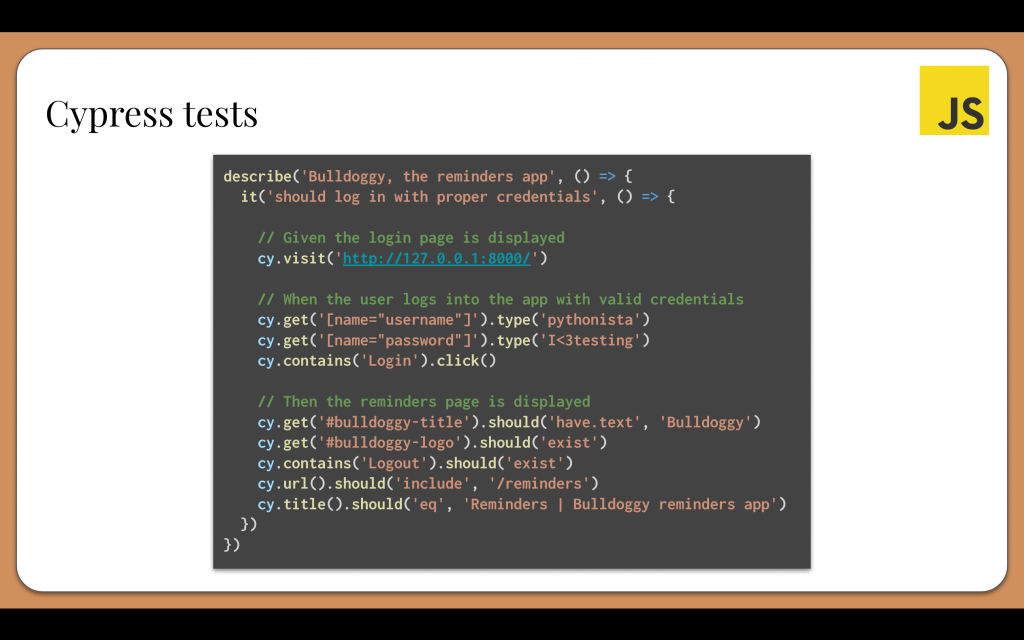
Here’s the code for the Bulldoggy login test in Cypress in JavaScript:
The steps are pretty much the same as before. Instead of creating some sort of browser object, all Cypress calls go to its cy object. The syntax is very concise and readable. We could even fit in a few more assertions. Cypress also handles waiting automatically, which makes the code less prone to flakiness.
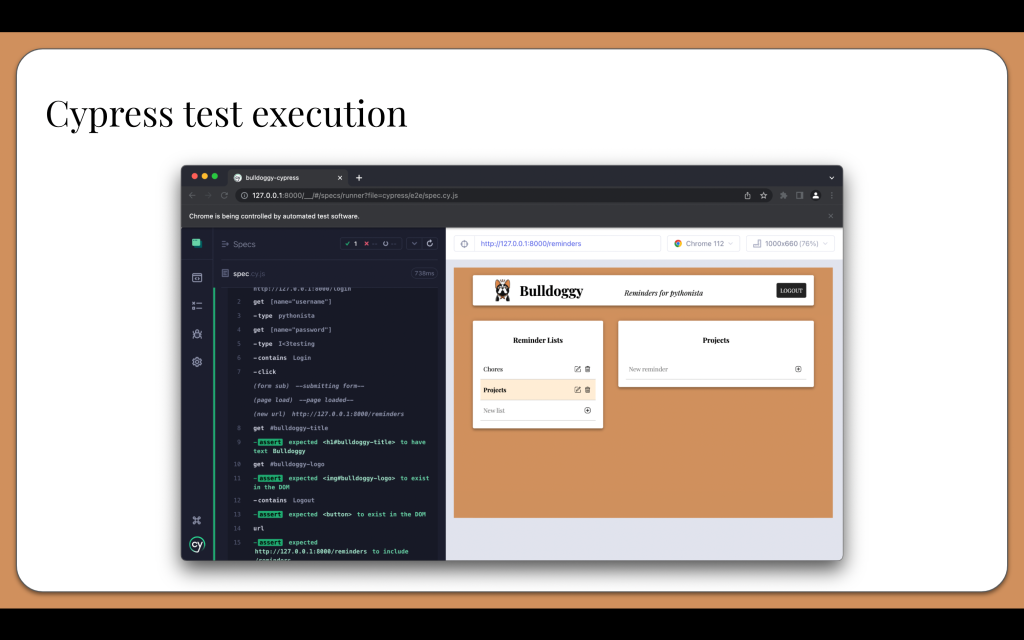
The rich developer experience comes alive when running Cypress tests. Cypress will open a browser window that will visually execute the test in front of us. Every step is traced so we can quickly pinpoint failures. Cypress is essentially a web app that tests web apps.
While Cypress is awesome, it is JavaScript-only, which stinks for folks who use other programming languages. For example, I’m a Pythonista at heart. Would I really want to test a full-stack Python web app like Bulldoggy with a browser automation tool that doesn’t have a Python language binding? Cypress is also trapped in the browser. It has some inherent limitations, like the fact that it can’t handle more than one open tab.
Playwright
Playwright is similar to Cypress in that it’s a modern, open source test framework that is developed and maintained by a company. Playwright manipulates the browser via debug protocols, which make it the fastest of the three tools we’ve discussed today. Playwright also takes a unique approach to browsers. Instead of testing full browsers like Chrome, Firefox, and Safari, it tests the corresponding browser engines: Chromium, Firefox (Gecko), and WebKit. Like Cypress, Playwright can also test APIs, and like Selenium, Playwright offers bindings for multiple popular languages, including Python.
To set up Playwright, of course we need to install the dependency packages. Then, we need to install the browser engines. Thankfully, Playwright manages its browsers for us. All we need to do is run the appropriate “Playwright install” for the chosen language.
Playwright takes a unique approach to browser setup. Instead of launching a new browser instance for each test, it uses one browser instance for all tests in the suite. Each test then creates a unique browser context within the browser instance, which is like an incognito session within the browser. It is very fast to create and destroy – much faster than a full browser instance. One browser instance may simultaneously have multiple contexts. Each context keeps its own cookies and session storage, so contexts are independent of each other. Each context may also have multiple pages or tabs open at any given time. Contexts also enable scalable parallel execution. We could easily run tests in parallel with the same browser instance because each context is isolated.
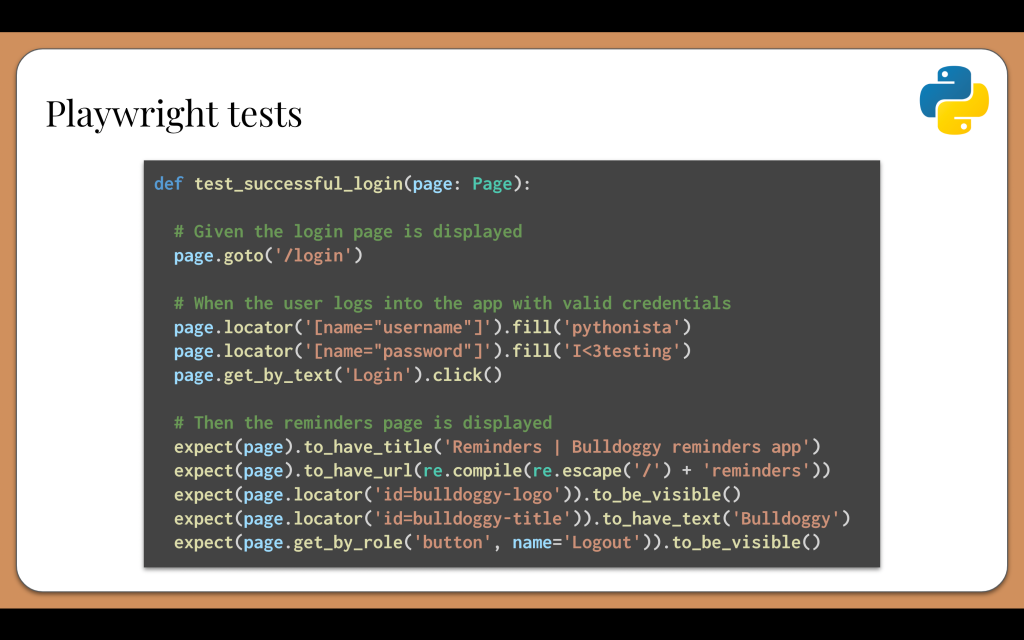
Let’s see that Bulldoggy login test one more time, but this time with Playwright code in Python. Again, the code is pretty similar to what we saw before. The major differences between these browser automation tools is not so much the appearance of the code but rather how they work and perform:
With Playwright, all interactions happen with the “page” object. By default, Playwright will create:
One browser instance to be shared by all tests in a suite
One context for each test case
One page within the context for each test case
When we read this code, we see locators for finding elements and methods for acting upon found elements. Notice how, like Cypress, Playwright automatically handles waiting. Playwright also packs an extensive assertion library with conditions that will wait for a reasonable timeout for their intended conditions to become true.
Again, like we said for the Selenium example code, if this were a real-world project, we would probably want to use page objects or the Screenplay Pattern to handle interactions rather than raw calls.
Playwright has a lot more cool stuff, such as the code generator and the trace viewer. However, Playwright isn’t perfect, and it also has some pain points:
Playwright tests browser engines, not full browsers. For example, Chrome is not the same as Chromium. There might be small test gaps between the two. Your team might also need to test full browsers to satisfy compliance rules.
Playwright is still new. It is years younger than Selenium and Cypress, so its community is smaller. You probably won’t find as many StackOverflow articles to help you as you would for the other tools. Features are also evolving rapidly, so brace yourself for changes.
Which one should you choose?
So, now that we have learned all about Selenium, Cypress, and Playwright, here’s the million-dollar question: Which one should we use? Well, the best web test tool to choose really depends on your needs. They are all great tools with pros and cons. I wanted to compare these tools head-to-head, so I created this table for quick reference:
In summary:
Selenium WebDriver is the classic tool that historically has appealed to testers. It supports all major browsers and several programming languages. It abides by open source, standards, and governance. However, it is a low-level browser automation tool, not a full test framework. Use it with a layer on top like Serenity, Boa Constrictor, or Pylenium.
Cypress is the darling test framework for frontend web developers. It is essentially a web app that tests web apps, and it executes tests in the same browser process as the app under test. It supports many browsers but must be coded exclusively in JavaScript. Nevertheless, its developer experience is top-notch.
Playwright is gaining popularity very quickly for its speed and innovative optimizations. It packs all the modern features of Cypress with the multilingual support of Selenium. Although it is newer than Cypress and Selenium, it’s growing fast in terms of features and user base.
If you want to know which one I would choose, come talk with me about it! You can also watch my PyCon US 2023 talk recording to see which one I would specifically choose for my personal Python projects.
I’m developing a pytest project to test an API. How can I pass environment information into my tests? I need to run tests against different environments like DEV, TEST, and PROD. Each environment has a different URL and a unique set of users.
This is a common problem for automated test suites, not just in Python or pytest. Any information a test needs about the environment under test is called configuration metadata. URLs and user accounts are common configuration metadata values. Tests need to know what site to hit and how to authenticate.
Using config files with an environment variable
There are many ways to handle inputs like this. I like to create JSON files to store the configuration metadata for each environment. So, something like this:
The structure of each file must be the same so that tests can treat them interchangeably.
I like using JSON files because:
they are plain text files with a standard format
they are easy to diff
they store data hierarchically
Python’s standard json module turns them into dictionaries in 2 lines flat
Then, I create an environment variable to set the desired config file:
export TARGET_ENV=dev.json
In my pytest project, I write a fixture to get the config file path from this environment variable and then read that file as a dictionary:
import json
import os
import pytest

@pytest.fixture
def target_env(scope='session'):
  config_path = os.environ['TARGET_ENV']
  with open(config_path) as config_file:
    config_data = json.load(config_file)
  return config_data
I’ll put this fixture in a conftest.py file so all tests can share it. Since it uses session scope, pytest will execute it one time before all tests. Test functions can call it like this:
Selecting the config file with a command line argument
If you don’t want to use environment variables to select the config file, you could instead create a custom pytest command line argument. Bas Dijkstra wrote an excellent article showing how to do this. Basically, you could add the following function to conftest.py to add the custom argument:
def pytest_addoption(parser):
  parser.addoption(
    '--target-env',
    action='store',
    default='dev.json',
    help='Path to the target environment config file')
Then, update the target_env fixture:
import json
import pytest

@pytest.fixture
def target_env(request):
  config_path = request.config.getoption('--target-env')
  with open(config_path) as config_file:
    config_data = json.load(config_file)
  return config_data
When running your tests, you would specify the config file path like this:
python -m pytest --target-env dev.json
Why bother with JSON files?
In theory, you could pass all inputs into your tests with pytest command line arguments or environment variables. You don’t need config files. However, I find that storing configuration metadata in files is much more convenient than setting a bunch of inputs each time I need to run my tests. In our example above, passing one value for the config file path is much easier than passing three different values for base URL, username, and password. Real-world test projects might need more inputs. Plus, configurations don’t change frequency, so it’s okay to save them in a file for repeated use. Just make sure to keep your config files safe if they have any secrets.
Validating inputs
Whenever reading inputs, it’s good practice to make sure their values are good. Otherwise, tests could crash! I like to add a few basic assertions as safety checks:
import json
import os
import pytest

@pytest.fixture
def target_env(request):
  config_path = request.config.getoption('--target-env')
  assert os.path.isfile(config_path)

  with open(config_path) as config_file:
    config_data = json.load(config_file)

  assert 'base_url' in config_data
  assert 'username' in config_data
  assert 'password' in config_data

  return config_data
Now, pytest will stop immediately if inputs are wrong.
Note: For this article, I’m going to focus on environment variables for UNIX based operating systems like macOS and Linux.
Environment variables are both a blessing and a curse. They let you easily pass data into processes like applications, scripts, and containers. I develop lots of test automation projects, and environment variables are one of the most common mechanisms for passing test inputs. For example, when I run a test suite against a web app, I might need to set inputs like this:
I can just run these commands directly in my terminal to set the variables I need. Unfortunately, any time I need to run my tests in another terminal session, I need to repeat the commands to set them again. That’s a big hassle, especially for secrets and long tokens. It would be nice to store these variables in a reusable way with my project.
Thankfully, there is: the environment file. You can create a file named .env and put all your “export” commands for setting variables in it. Basically, just copy those lines above into the .env file. Then, run the following command whenever you want to set those variables in your terminal:
source .env
You can verify the value of the variables using the “echo” command. Just remember to prefix variable names with “$“. For example:
echo $BASE_URL
The output should be:
http://my.website.com/
I like to create a .env file in every project that needs environment variables. That way, I can easily keep track of all the variables the project needs in one place. I put the .env in the project’s root directory to make it easy to find. Any time I need to run the project, I run the “source” command without any worries.
If the project is stored in a Git repository, then I also add “.env” to the repository’s .gitignore file. That way, my variables won’t be committed to the repository. It’s rude to commit personal settings to a repository, and it’s dangerous and insecure to commit secrets. Many .gitignore templates already include a “.env” entry, too, since using environment files like this is a common practice.
If you really want to share your variables, here are a few options:
Just commit them to the repository.
Post them to a secrets sharing service (like LastPass).
I started Boa Constrictor back in 2018 because I loathed page objects. On a previous project, I saw page objects balloon to several thousand lines long with duplicative methods. Developing new tests became a nightmare, and about 10% of tests failed daily because they didn’t handle waiting properly.
So, while preparing a test strategy at a new company, I invested time in learning the Screenplay Pattern. To be honest, the pattern seemed a bit confusing at first, but I was willing to try anything other than page objects again. Eventually, it clicked for me: Actors use Abilities to perform Interactions. Boom! It was a clean separation of concerns.
Unfortunately, the only major implementations I could find for the Screenplay Pattern at the time were Serenity BDD in Java and JavaScript. My company was a .NET shop. I looked for C# implementations, but I didn’t find anything that I trusted. So, I took matters into my own hands and implemented the Screenplay Pattern myself in .NET. Initially, I implemented Selenium WebDriver interactions. Later, my team and I added RestSharp interactions. We eventually released Boa Constrictor as an open source project in October 2020 as part of Hacktoberfest.
With Boa Constrictor, I personally sought to reinvigorate interest in the Screenplay Pattern. By bringing the Screenplay Pattern to .NET, we enabled folks outside of the Java and JavaScript communities to give it a try. With our rich docs, examples, and videos, we made it easy to onboard new users. And through conference talks and webinars, we popularized the concepts behind Screenplay, even for non-C# programmers. It’s been awesome to see so many other folks in the testing community start talking about the Screenplay Pattern in the past few years.
I also wanted to provide a standalone implementation of the Screenplay Pattern. Since the Screenplay Pattern is a design for automating interactions, it could and should integrate with any .NET test framework: SpecFlow, MsTest, NUnit, xUnit.net, and any others. With Boa Constrictor, we focused singularly on making interactions as excellent as possible, and we let other projects handle separate concerns. I did not want Boa Constrictor to be locked into any particular tool or system. In this sense, Boa Constrictor diverged from Serenity BDD – it was not meant to be a .NET version of Serenity, despite taking much inspiration from Serenity.
Furthermore, in the design and all the messaging for Boa Constrictor, I strived to make the Screenplay Pattern easy to understand. So many folks I knew gave up on Screenplay in the past because they thought it was too complicated. I wanted to break things down so that any automation developer could pick it up quickly. Hence, I formed the soundbite, “Actors use Abilities to perform Interactions,” to describe the pattern in one line. I also coined the project’s slogan, “Better Interactions for Better Automation,” to clearly communicate why Screenplay should be used over alternatives like raw calls or page objects.
So far, Boa Constrictor has succeeded modestly well in these goals. Now, the project is pursuing one more goal: democratizing the Screenplay Pattern.
At its heart, the Screenplay Pattern is a generic pattern for any kind of interactions. The core pattern should not favor any particular tool or package. Anyone should be able to implement interaction libraries using the tools (or “Abilities”) they want, and each of those libraries should be treated equally without preference. Recently, in our plans for Boa Constrictor 3, we announced that we want to create separate packages for the “core” pattern and for each library of interactions. We also announced plans to add new libraries for Playwright and Applitools. The existing libraries – Selenium WebDriver and RestSharp – need not be the only libraries. Boa Constrictor was never meant to be merely a WebDriver wrapper or a superior page object. It was meant to provide better interactions for any kind of test automation.
In version 3.0.0, we successfully separated the Boa.Constrictor project into three new .NET projects and released a NuGet package for each:
This separation enables folks to pick the parts they need. If they only need Selenium WebDriver interactions, then they can use just the Boa.Constrictor.Selenium package. If they want to implement their own interactions and don’t need Selenium or RestSharp, then they can use the Boa.Constrictor.Screenplay package without being forced to take on those extra dependencies.
Furthermore, we continued to maintain the “classic” Boa.Constrictor package. Now, this package simply claims dependencies on the other three packages in order to preserve backwards compatibility for folks who used previous version of Boa Constrictor. As part of the upgrade from 2.0.x to 3.0.x, we did change some namespaces (which are documented in the project changelog), but the rest of the code remained the same. We wanted the upgrade to be as straightforward as possible.
The core contributors and I will continue to implement our plans for Boa Constrictor 3 over the coming weeks. There’s a lot to do, and we will do our best to implement new code with thoughtfulness and quality. We will also strive to keep everything documented. Please be patient with us as development progresses. We also welcome your contributions, ideas, and feedback. Let’s make Boa Constrictor excellent together.