Visual Studio Code

Gherkin Syntax Highlighting in Visual Studio Code

Visual Studio Code is an incredible code editor that’s on the rise. It offers the power of an IDE with the speed and simplicity of a lightweight text editor, similar to Sublime, Atom, and Notepad++. If you’re a BDD addict, then VS Code is a great choice for writing Gherkin features, too! There are a number of extensions for Gherkin. Which one is the best? Below is my recommendation.

TL;DR

Install both:

Extension #1

VS Code has a few free extensions to support Gherkin. The first one I tried was Cucumber (Gherkin) Full Support. This one had the highest number of installs. When I started writing feature files, it provided snippets for each section and syntax colors. The documentation said it could also provide step suggestions (meaning, I type “Given” and it shows me all available Given steps) and navigation to step definition code, but since it looked like it only worked for JavaScript, I didn’t try it myself. that left me with no step suggestions. The indentation looked off, too. Not perfect. I wanted a better extension.

This slideshow requires JavaScript.

Extension #2

The second one I tried was Snippets and Syntax Highlight for Gherkin (Cucumber). It provides colorful syntax highlighting and a few three-letter snippets for Gherkin keywords. When I typed “fea”, a full template for a Feature section appeared with user story stubs (“In order to ___, As a ___, I want ___”). Nice! Good practice. The “sce” snippet did the same thing for the Scenario section with Given, When, and Then steps. Each section was indented nicely, too. The only downside was the lack of a snippet for Examples tables. Nevertheless, tables were still highlighted. But again, no step suggestions.

This slideshow requires JavaScript.

Extension #3

The third extension I tried was Feature Syntax Highlight and Snippets (Cucumber). It was very similar to the previous extension, but it used different colors. The snippet shortcuts were also not as intuitive – they used the letter “f” for feature followed by the first letter of the section. For example, “ff” was a Feature section, and “fs” was a Scenario section. Unfortunately, this extension did not provide step suggestions. Comments and example table rows did not get highlighted, either. Personally, I preferred the previous extension’s color scheme.

This slideshow requires JavaScript.

Extension #4

The fourth extension I tried was Gherkin step autocomplete. This one promised step suggestions! However, I had some trouble setting it up. When I enabled the extension by itself, feature files did not show any syntax highlighting, and the steps had no suggestions. What? Lame. What the README doesn’t say is that it relies on a separate extension for feature file support. So, I enabled extension #2 together with this one. Then, I had to move my feature file into a project-root-level directory named “features.” (This path could be customized in the extension’s settings, but “features” is the default.) And, voila! I got pretty colors and step suggestions.

This slideshow requires JavaScript.

But Wait, There’s More!

There were even more extensions for Gherkin. I was happy with #2 and #4, so I didn’t try others. The others also didn’t have as many installations. If anyone finds goodness out of others, please post in the comments!

Django Projects in Visual Studio Code

Visual Studio Code is a free source code editor developed my Microsoft. It feels much more lightweight than traditional IDEs, yet its extensions make it versatile enough to handle just about any type of development work, including Python and the Django web framework. This guide shows how to use Visual Studio Code for Django projects.

Installation

Make sure the latest version of Visual Studio Code is installed. Then, install the following (free) extensions:

Reload Visual Studio Code after installation.

This slideshow requires JavaScript.

Editing Code

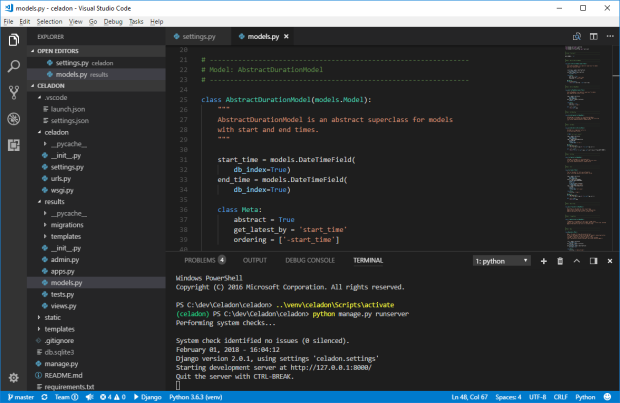
The VS Code Python editor is really first-class. The syntax highlighting is on point, and the shortcuts are mostly what you’d expect from an IDE. Django template files also show syntax highlighting. The Explorer, which shows the project directory structure on the left, may be toggled on and off using the top-left file icon. Check out Python with Visual Studio Code for more features.

This slideshow requires JavaScript.

Virtual Environments

Virtual environments with venv or virtualenv make it easy to manage Python versions and packages locally rather than globally (system-wide). A common best practice is to create a virtual environment for each Python project and install only the packages the project needs via pip. Different environments make it possible to develop projects with different version requirements on the same machine.

Visual Studio Code allows users to configure Python environments. Navigate to File > Preferences > Settings and set the python.pythonPath setting to the path of the desired Python executable. Set it as a Workspace Setting instead of a User Setting if the virtual environment will be specific to the project.

VS Code Python Venv

Python virtual environment setup is shown as a Workspace Setting. The terminal window shows the creation and activation of the virtual environment, too.

Helpful Settings

Visual Studio Code settings can be configured to automatically lint and format code, which is especially helpful for Python. As shown on Ruddra’s Blog, install the following packages:

$ pip install pep8
$ pip install autopep8
$ pip install pylint

And then add the following settings:

{
    "team.showWelcomeMessage": false,
    "editor.formatOnSave": true,
    "python.linting.pep8Enabled": true,
    "python.linting.pylintPath": "/path/to/pylint",
    "python.linting.pylintArgs": [
        "--load-plugins",
        "pylint_django"
    ],
    "python.linting.pylintEnabled": true
}

Editor settings may also be language-specific. For example, to limit automatic formatting to Python files only:

{
    "[python]": {
        "editor.formatOnSave": true
    }
}

Make sure to set the pylintPath setting to the real path value. Keep in mind that these settings are optional.

VS Code Django Settings.png

Full settings for automatically formatting and linting the Python code.

Running Django Commands

Django development relies heavily on its command-line utility. Django commands can be run from a system terminal, but Visual Studio Code provides an Integrated Terminal within the app. The Integrated Terminal is convenient because it opens right to the project’s root directory. Plus, it’s in the same window as the code. The terminal can be opened from ViewIntegrated Terminal or using the “Ctrl-`” shortcut.

VS Code Terminal.png

Running Django commands from within the editor is delightfully convenient.

Debugging

Debugging is another way Visual Studio Code’s Django support shines. The extensions already provide the launch configuration for debugging Django apps! As a bonus, it should already be set to use the Python path given by the python.pythonPath setting (for virtual environments). Simply switch to the Debug view and run the Django configuration. The config can be edited if necessary. Then, set breakpoints at the desired lines of code. The debugger will stop at any breakpoints as the Django app runs while the user interacts with the site.

VS Code Django Debugging

The Django extensions provide a default debug launch config. Simply set breakpoints and then run the “Django” config to debug!

Version Control

Version control in Visual Studio Code is simple and seamless. Git has become the dominant tool in the industry, but VS Code supports other tools as well. The Source Control view shows all changes and provides options for all actions (like commits, pushes, and pulls). Clicking changed files also opens a diff. For Git, there’s no need to use the command line!

VS Code Git

The Source Control view with a diff for a changed file.

Visual Studio Code creates a hidden “.vscode” directory in the project root directory for settings and launch configurations. Typically, these settings are specific to a user’s preferences and should be kept to the local workspace only. Remember to exclude them from the Git repository by adding the “.vscode” directory to the .gitignore file.

VS Code gitignore

.gitignore setting for the .vscode directory

Editor Comparisons

JetBrains PyCharm is one of the most popular Python IDEs available today. Its Python and Django development features are top-notch: full code completion, template linking and debugging, a manage.py console, and more. PyCharm also includes support for other Python web frameworks, JavaScript frameworks, and database connections. Django features, however, are available only in the (paid) licensed Professional Edition. It is possible to develop Django apps in the free Community Edition, as detailed in Django Projects in PyCharm Community Edition, but the missing features are a significant limitation. Plus, being a full IDE, PyCharm can feel heavy with its load time and myriad of options.

PyCharm is one of the best overall Python IDEs/editors, but there are other good ones out there. PyDev is an Eclipse-based IDE that provides Django support for free. Sublime Text and Atom also have plugins for Django. Visual Studio Code is nevertheless a viable option. It feels fast and simple yet powerful. Here’s my recommended decision table:

What’s Going On What You Should Do
Do you already have a PyCharm license? Just use PyCharm Professional Edition.
Will you work on a large-scale Django project? Strongly consider buying the license.
Do you need something fast, simple, and with basic Django support for free? Use Visual Studio Code, Atom, or Sublime Text.
Do you really want to stick to a full IDE for free? Pick PyDev if you like Eclipse, or follow the guide for Django Projects in PyCharm Community Edition


[Update on 9/30/2018: Check out the official VS Code guide here: Use Django in Visual Studio Code.]

Debugging Angular Apps through Visual Studio Code

Angular is a great front-end framework for web apps. Visual Studio Code is a great source code editor. Their powers combined let you not only develop Angular app code but also debug it through the editor! VS Code debugging even works for TypeScript.

The Basic Guide

To set up debugging, simply follow the steps in the Debugging Angular section of the official Using Angular in VS Code guide. (This guide is really helpful for other VS Code Angular topics, too.) The basic steps are:

  1. Make sure VS Code, Google Chrome, and all the Angular parts are already installed.
  2. Install the Debugger for Chrome extension in VS Code.
  3. Create a launch.json config file (by clicking the gear icon in the Debug view).
  4. Set an appropriate config spec in the .vscode/launch.json file (example below).
  5. Set breakpoints in the editor.
  6. Launch the Angular app separate from the debugger (such as by running “ng serve” from the command line).
  7. Run the VS Code debugger “launch” job against the app (by clicking the green arrow in the Debug view).

The launch.json file should look like this, with values changed to reflect your environment:

{
    "version": "0.2.0",
    "configurations": [
        {
            "type": "chrome",
            "request": "launch",
            "name": "Launch Chrome against localhost",
            "url": "http://localhost:4200",
            "webRoot": "${workspaceFolder}"
        },
        {
            "type": "chrome",
            "request": "attach",
            "name": "Attach to Chrome",
            "port": 9222,
            "webRoot": "${workspaceFolder}"
        }
    ]
}

Note that the app must already be running before the debugger is launched! (This point is not entirely clear in the official guide.) The debugger will launch the Google Chrome browser and load the URL provided in the launch.json config. Any time execution hits a breakpoint, execution will stop and let VS Code step through it.

The original guide provides screen shots to better illustrate these steps. Please follow it for more precise steps.

Browser Options

Microsoft publishes the Debugger for Chrome and Debugger for Edge extensions for this sort of debugging. It looks like other non-Microsoft VS Code extensions are available for Firefox, PhantomJS, and Safari on iOS, but the launch.json config looks different.

Debugger Config and Source Control

Typically, it’s a best practice to avoid committing user-specific config files to source control. One user’s settings could conflict with another’s, potentially breaking workspaces. Personally, I would caution against submitting anything in the .vscode directory to source control unless (a) everyone on the team uses VS Code exclusively for the project and (b) the config file entries are usable by everyone on the team.