
I’ve always been frustrated with poor quality audio recordings. Microphones built into laptops are very convenient, but they usually yield tinny sound lacking the depth of real voices. When I asked my audiophile friends for advice, they recommended studio-level equipment that was beyond my comprehension and my budget. As a software guy, I just wanted an audio setup that captured high-quality audio while still being convenient for everyday usage. I’d need it for remote meetings as well as for recording talks and tutorials. I was willing to pay for good equipment as long as I could use it well. Unfortunately, my biggest frustration was ignorance. I didn’t know anything about recording.
Here’s what I finally found to work well for me:
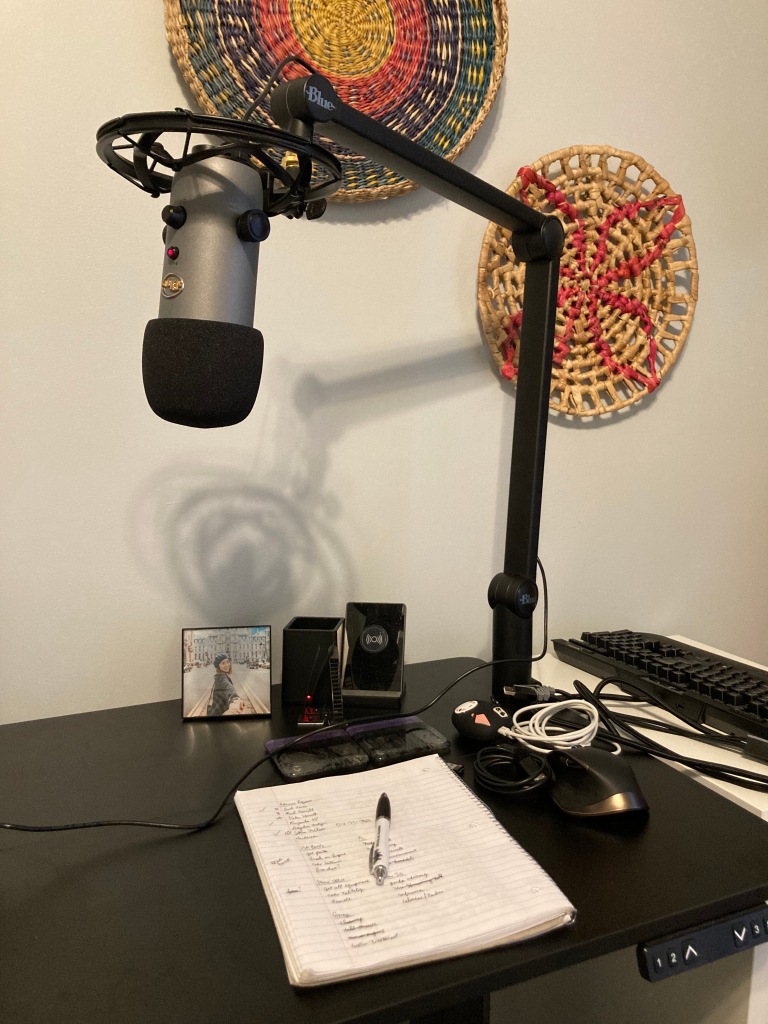
- A Blue Yeti microphone
- A Blue Compass boom arm
- A Blue Radius III shockmount
- A foam microphone windscreen
When I did my research, the Blue Yeti microphone was at the top of everyone’s recommendation list. The nicest thing about a Blue Yeti mic is that it connects via USB. You simply plug it right into your laptop and select audio input and output channels. The mic doesn’t need an external power source, either.
Initially, I bought only the Blue Yeti mic and the foam windscreen. Instead of using the boom arm, I used the tabletop stand that came with the mic for all my recordings. This was a big mistake. The tabletop stand picked up a lot of local noise, like typing on a keyboard. The audio quality it picked up also sounded like it had a bit of an echo, which may have been due to sound bouncing off the tabletop or my hardwood floors.
The boom arm and shockmount made a huge improvement in recording quality. Plus, with the boom arm mounted firmly to my desk, I can easily move it towards me for recording or out of the way otherwise. It feels quite sturdy. I chose to use all Blue products so that I could be certain that they’d work together. You can save quite a bit of money if you buy the microphone, boom arm, and shockmount together as a bundle on Amazon (~$200), instead of a la carte like I did (~$250).
I plan to get a docking station for my laptop so that I can plug the microphone’s USB cable into the dock, simplifying desk’s cable management.
Even with this new setup, I still felt like I didn’t understand how to use my Blue Yeti microphone to its full potential. Thankfully, YouTube came to the rescue! This video greatly helped me understand things like tuning the mic’s gain and positioning the mic while speaking:
In summary, here’s what I like about the setup:
- It yields very good (maybe professional?) audio recording quality.
- It is simple enough for anyone to set up and use.
- It is convenient to use for remote meetings, video recordings, etc.
- It feels quite sturdy.
- It is relatively affordable (compared to other audio equipment).
Please note: I am not an expert in audio equipment, and this article is not sponsored by any company. I simply hope that someone can benefit from the things I learned (and possibly save a few bucks) if they want to improve their own recording game!
